Difference between revisions of "Ime Conto D2"
Jump to navigation
Jump to search
| Line 7: | Line 7: | ||
== First steps == | == First steps == | ||
IME Conto D2 has to be configured following the instruction of the data sheet. Configure the Modbus address, baud rate, parity using the dip switches. In this example we will use: 9600,8,1,0,0 and Modbus address 1. | IME Conto D2 has to be configured following the instruction of the data sheet. Configure the Modbus address, baud rate, parity using the dip switches. In this example we will use: 9600,8,1,0,0 and Modbus address 1. | ||
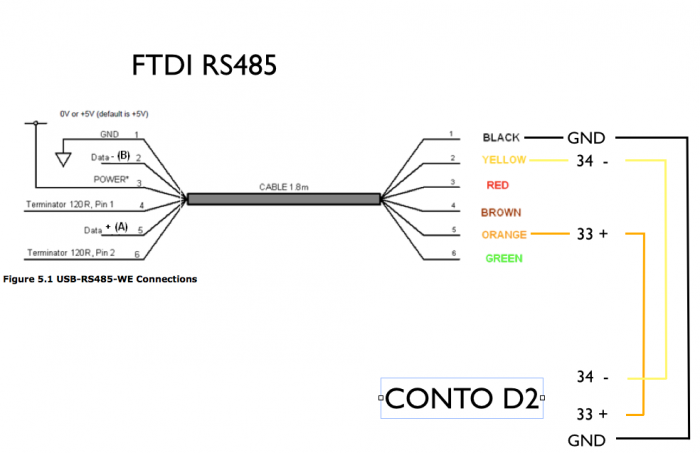
| − | Connect the IME Conto D2 to a Modbus bus. Assuming that we are using a FTDI RS485-USB gateway this is the connections scheme: | + | Connect the IME Conto D2 to a Modbus bus. Assuming that we are using a FTDI RS485-USB gateway, this is the connections scheme: |
[[File:IME Conto D2-1.png|center|700px]] | [[File:IME Conto D2-1.png|center|700px]] | ||
Revision as of 16:51, 8 May 2014
IME Conto D2 is a single-phase energy meter with modbus support.
What to I need?
Hsyco, of course. A Modbus/gateway or a FTDI RS485 cable. For further information consult the Modbus IO server page.
First steps
IME Conto D2 has to be configured following the instruction of the data sheet. Configure the Modbus address, baud rate, parity using the dip switches. In this example we will use: 9600,8,1,0,0 and Modbus address 1. Connect the IME Conto D2 to a Modbus bus. Assuming that we are using a FTDI RS485-USB gateway, this is the connections scheme:
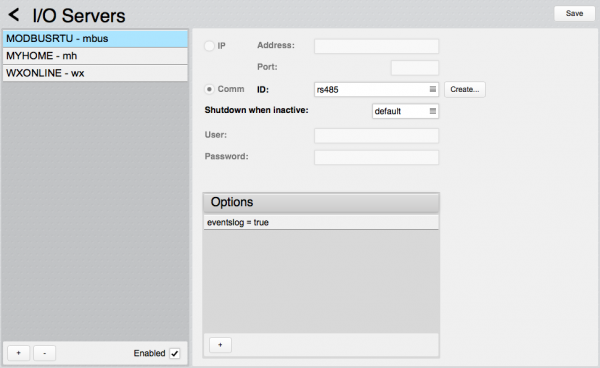
In Settings add a RTU Modbus communication port:

