Difference between revisions of "Qeed-QI-485"
| (4 intermediate revisions by the same user not shown) | |||
| Line 1: | Line 1: | ||
| − | Qeed-QI-485 is a single-phase energy meter (up to 50 A). The integration with HSYCO is | + | Qeed-QI-485 is a single-phase energy meter (up to 50 A). The integration with HSYCO is possible via MODBUS protocol. |
== What to I need? == | == What to I need? == | ||
| Line 5: | Line 5: | ||
A Modbus/gateway or a FTDI RS485 cable. For further information consult the '''[[Modbus]]''' IO server page. | A Modbus/gateway or a FTDI RS485 cable. For further information consult the '''[[Modbus]]''' IO server page. | ||
| − | + | If you are using the FTDI RS485 please follow this wiring scheme: | |
orange wire --> Qeed-QI-485 A+ pin | orange wire --> Qeed-QI-485 A+ pin | ||
| Line 14: | Line 14: | ||
Configure the Modbus address, baud rate, parity using the software FACILE-QI-POWER. You can use the FTDI RS485 cable directly connected to a Win XP/7/8 computer. | Configure the Modbus address, baud rate, parity using the software FACILE-QI-POWER. You can use the FTDI RS485 cable directly connected to a Win XP/7/8 computer. | ||
In this example we will use: 9600,8,2,0,0 and Modbus address 1. | In this example we will use: 9600,8,2,0,0 and Modbus address 1. | ||
| − | Connect the sensor | + | Connect the sensor Qeed-QI-48 to the Modbus bus. Assuming that we are using FTDI RS485 this is a screenshot of the Modbus RTU server definition in Settings: |
[[File:Qeed-QI-485-1.png|center|500px]] | [[File:Qeed-QI-485-1.png|center|500px]] | ||
| − | This is a screenshot of the | + | This is a screenshot of the "ftdi" serial port as defined in Settings: |
[[File:Qeed-QI-485-2.png|center|500px]] | [[File:Qeed-QI-485-2.png|center|500px]] | ||
Latest revision as of 13:34, 5 November 2014
Qeed-QI-485 is a single-phase energy meter (up to 50 A). The integration with HSYCO is possible via MODBUS protocol.
What to I need?
Hsyco, of course. A Modbus/gateway or a FTDI RS485 cable. For further information consult the Modbus IO server page.
If you are using the FTDI RS485 please follow this wiring scheme:
orange wire --> Qeed-QI-485 A+ pin
yellow wire --> Qeed-QI-485 A- pin
First steps
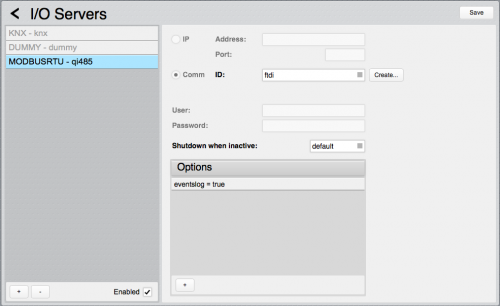
Configure the Modbus address, baud rate, parity using the software FACILE-QI-POWER. You can use the FTDI RS485 cable directly connected to a Win XP/7/8 computer. In this example we will use: 9600,8,2,0,0 and Modbus address 1. Connect the sensor Qeed-QI-48 to the Modbus bus. Assuming that we are using FTDI RS485 this is a screenshot of the Modbus RTU server definition in Settings:
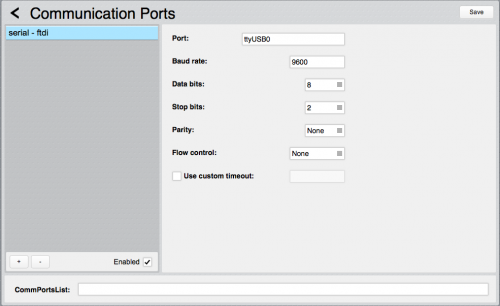
This is a screenshot of the "ftdi" serial port as defined in Settings:
Integration
Let's write these simple lines in events.txt file:
init : programtimer qipolling = repeat 1
programtimer qipolling : io qi485.1.0  = readholdingregisters:ushort:8, io qi485.1.8  = readholdingregisters:float:2, io qi485.1.71 = readholdingregisters:bitshort,  io qi485.1.73  = readholdingregisters:float:29
#parameters
io qi485.1.0 : $qi-machineid = io qi485.1.0
io qi485.1.1 : $qi-fwversion = io qi485.1.1
io qi485.1.2 : $qi-modbusaddr = io qi485.1.2
io qi485.1.3 : $qi-delay = io qi485.1.3
io qi485.1.4 = 0 : $qi-baudrate = 1200
io qi485.1.4 = 1 : $qi-baudrate = 2400
io qi485.1.4 = 2 : $qi-baudrate = 4800
io qi485.1.4 = 3 : $qi-baudrate = 9600
io qi485.1.4 = 4 : $qi-baudrate = 19200
io qi485.1.4 = 5 : $qi-baudrate = 38400
io qi485.1.4 = 6 : $qi-baudrate = 57600
io qi485.1.4 = 7 : $qi-baudrate = 115200
io qi485.1.5 = 0 : $qi-parity = "no"
io qi485.1.5 = 1 : $qi-parity = "odd"
io qi485.1.5 = 2 : $qi-parity = "even"
io qi485.1.6 : $qi-dcfilter = io qi485.1.6
io qi485.1.7 : $qi-flagmeasurement = io qi485.1.7
io qi485.1.8 : $qi-tvratio = io qi485.1.8
io qi485.1.9 : $qi-taratio = io qi485.1.9
#measurements
io qi485.1.73: $qi-vrms = io qi485.1.73, $qi-vrms round 1
io qi485.1.75: $qi-irms = io qi485.1.75, $qi-irms / 1000, $qi-irms round 1,
io qi485.1.77: $qi-p = io qi485.1.77, $qi-p round 1
io qi485.1.79: $qi-q = io qi485.1.79
io qi485.1.81: $qi-s = io qi485.1.81
io qi485.1.83: $qi-cosfi = io qi485.1.83
io qi485.1.85: $qi-freq = io qi485.1.85
io qi485.1.87: $qi-thd = io qi485.1.87
io qi485.1.89: $qi-totalenergy = io qi485.1.89, $qi-totalenergy round 0
io qi485.1.91: $qi-onlypositiveenergy = io qi485.1.91
io qi485.1.93: $qi-onlynegativeenergy = io qi485.1.93
io qi485.1.95: $qi-vpeak = io qi485.1.95
io qi485.1.97: $qi-ipeak = io qi485.1.97
io qi485.1.99: $qi-vmax = io qi485.1.99
io qi485.1.101: $qi-vmin = io qi485.1.101
io qi485.1.103: $qi-imax = io qi485.1.103
io qi485.1.105: $qi-imin = io qi485.1.105
io qi485.1.107: $qi-pmax = io qi485.1.107
io qi485.1.109: $qi-pmin = io qi485.1.109
io qi485.1.111: $qi-qmax = io qi485.1.111
io qi485.1.113: $qi-qmin = io qi485.1.113
io qi485.1.115: $qi-smax = io qi485.1.115
io qi485.1.117: $qi-smin = io qi485.1.117
io qi485.1.119: $qi-cosfimax = io qi485.1.119
io qi485.1.121: $qi-cosfimin = io qi485.1.121
io qi485.1.123: $qi-fmax = io qi485.1.123
io qi485.1.125: $qi-fmin = io qi485.1.125
io qi485.1.127: $qi-thdmax = io qi485.1.127
io qi485.1.129: $qi-thdmin = io qi485.1.129
#labels
$qi-vrms : uiset qi-currentvoltage-label.value = $qi-vrms " V"
$qi-irms : uiset qi-currenti-label.value = $qi-irms " A"
$qi-p : uiset qi-currentpower-label.value = $qi-p " W"
$qi-totalenergy : uiset qi-currenttotalenergy-label.value = $qi-totalenergy " kWh"

