|
|
| Line 126: |
Line 126: |
| | | | |
| | The Manager is the Web-based toolkit of applications that you will use to create customized graphic user interfaces and access all system’s configuration files. | | The Manager is the Web-based toolkit of applications that you will use to create customized graphic user interfaces and access all system’s configuration files. |
| − |
| |
| − | == Files Organization ==
| |
| − |
| |
| − | The general structure of HSYCO’s main directory is shown in the following diagram.
| |
| − |
| |
| − |
| |
| − | [[File:Installation File Organization.png|center]]
| |
| − |
| |
| − |
| |
| − | === hsyco/access.ini ===
| |
| − | This file contains the information corresponding to the users’ PIN/PUK access codes. This file can be manually modified to create or delete a PIN code, though it is usually modified through the users management pages in the HSYCO Web interface. It is also updated by HSYCO after every access, showing the time and the IP address of the last access and the number of access errors made by every user.
| |
| − | ----
| |
| − |
| |
| − | === hsyco/acl.ini ===
| |
| − | This file is used to define server-side access control lists for Web-based user commands. The optional acl.ini file defines the rules to allow or reject commands.
| |
| − |
| |
| − | See the Access Control List chapter in the Appendix section for additional information.
| |
| − | ----
| |
| − |
| |
| − | === hsyco/console.log ===
| |
| − | console.log is a system log file. It contains information and error messages generated by the operating system or by the Java Virtual Machine.
| |
| − |
| |
| − | For example, the following message:
| |
| − |
| |
| − | Exception in thread "main" java.lang.NoClassDefFoundError: com/hsyco/OpenWebNetMonitor
| |
| − | at com.hsyco.hsyco.main(hsyco.java:4794)
| |
| − | Caused by: java.lang.ClassNotFoundException: com.hsyco.OpenWebNetMonitor
| |
| − |
| |
| − | suggests that one of the HSYCO Java libraries is missing. This file is therefore useful in the testing stage or during the development of an additional Java component, while it does not provide any relevant information about the normal execution of the HSYCO software.
| |
| − | ----
| |
| − |
| |
| − | === hsyco/hsyco.ini ===
| |
| − | This is the main configuration file, containing all HSYCO configuration parameters. It is fully described in the Configuration chapter. Any change to this file causes the automatic restart of HSYCO after a few seconds.
| |
| − | ----
| |
| − |
| |
| − | === hsyco/hsyco.jar ===
| |
| − | This file contains all the components of the HSYCO software. In order to update HSYCO SERVER to a newer version, you replace this file with a new one, containing the whole code and the resources of the software in a compressed format. Any change to this file causes the automatic restart of HSYCO after a few seconds.
| |
| − | ----
| |
| − |
| |
| − | === hsyco/hsyco.keys ===
| |
| − | This file contains the '''SSL''' certificate for the '''HTTPS''' web traffic cryptography. When HSYCO is started, if the file is not available, a new SSL certificate is automatically generated according to the name defined in hsyco.ini. Otherwise, HSYCO simply uses the certificate contained in this file, which could have been also generated by an official '''Certification Authority (CA)'''<sup>[[#note1|[Note 1]]]</sup>. If an official certificate is not used, this file is created and managed by HSYCO without any manual intervention.
| |
| − |
| |
| − | <span id="note1">
| |
| − | ;Note 1 : For example Verisign or Thawte.
| |
| − | </span>
| |
| − | ----
| |
| − |
| |
| − | === hsyco/keys.data ===
| |
| − | It is the database of the secure authentication keys between the Web Browser and HSYCO. This file is created and managed by HSYCO and must not be modified or erased.
| |
| − | ----
| |
| − |
| |
| − | === hsyco/license.txt ===
| |
| − | This file contains the software license key needed to make HSYCO fully operational. When HSYCO is started for the first time, or if this file is removed before start-up, HSYCO creates a new file containing an encrypted unique code that identifies the computer on which the software is running. In order to unlock HSYCO, the file needs to contain the software license key, issued by Home Systems Consulting.
| |
| − |
| |
| − | If the license key is not available in the file or if it is not correct, HSYCO disables all the functions of access to any field device, keeping only the HTTP and HTTPS Web Server running. It will be therefore possible to access the Web pages, but not to execute any action on or interface to the systems connected to HSYCO.
| |
| − | ----
| |
| − |
| |
| − | === hsyco/systemtopo.txt ===
| |
| − | Contains the list of all the devices of the system and names of the '''Wi-Fi''' location zones<sup>[[#note2|[Note 2]]]</sup>.
| |
| − |
| |
| − | This file format is described in details in the Configuration chapter.
| |
| − |
| |
| − | systemtopo.txt can be modified at any time; any change is applied within a few seconds without restarting HSYCO. Web pages are automatically reloaded after any change to systemtopo.txt.
| |
| − |
| |
| − | <span id="note2">
| |
| − | ;Note 2 : That is, the list of the different Access Point devices that constitute the local wireless network.
| |
| − | </span>
| |
| − | ----
| |
| − |
| |
| − | === hsyco/timers.data ===
| |
| − | It is the database of the timers’ settings, such as alarms, irrigation or light timers, managed by HSYCO. This file is created and managed by HSYCO and should not be modified or erased.
| |
| − | ----
| |
| − |
| |
| − | === hsyco/com/hsyco ===
| |
| − | This directory contains the customizable Java files. In particular, the file '''user.class''' must always exist, even just in its original version if it has not been customized. The corresponding source file '''user.java''' is not necessary for the correct execution of the software.
| |
| − | ----
| |
| − |
| |
| − | === hsyco/www ===
| |
| − | The www directory contains all the customizable files corresponding to the Web pages of the user interface. All the required standard files can be found in the '''hsyco.jar''' package and therefore are not included in www; however it is always possible to add new customized files in appropriate locations in www; these files will have priority over the standard files contained in hsyco.jar.
| |
| − |
| |
| − | {{note|Whenever HSYCO detects any change to the files in www and in its sub-directories, it automatically forces the refresh of the Web page on the connected browsers, so that all the changes are immediately visible.}}
| |
| − |
| |
| − | The directories and the standard files will be described in the following paragraphs, although the directories and files structure can be customized as needed.
| |
| − | ----
| |
| − |
| |
| − | === hsyco/www/<project>/index.hsm ===
| |
| − | The <project> directory, contains the definition of the user interface pages. Each <project> directory contains the '''index.hsm''' file, with the complete definition of the whole Web interface. This file format is described in the Personalization chapter.
| |
| − |
| |
| − | It is not possible to use names such as img and the skins’ names, which are reserved. It is also not possible to have more than one Web interface description file in the same directory.
| |
| − | ----
| |
| − |
| |
| − | === hsyco/www/<project>/img ===
| |
| − | Contains the files of the images associated to the automation and lighting devices defined in the systemtopo.txt file, or any other image file used by the Web interface.
| |
| − |
| |
| − | Files in this subdirectory have priority over files in the hsyco/www/img directory.
| |
| − | ----
| |
| − |
| |
| − | === hsyco/www/<skin> ===
| |
| − | Customized skins can be defined and saved in www subdirectories. The files of the standard skins are included in the hsyco.jar package file. Creating a directory with the same name of a standard skin is possible, but should be done carefully, as it will override the standard skin files.
| |
| − | ----
| |
| − |
| |
| − | === hsyco/www/img ===
| |
| − | Contains the files of the images associated to the automation and lighting devices defined in the systemtopo.txt file, or any other image file used by the Web interface. Files in the img/ sub-directory under the project's main directory have priority over files in this directory.
| |
| − | ----
| |
| − |
| |
| − | === hsyco/www/public ===
| |
| − | The ''HTTPServerPublicDirectory'' parameter defined in System Settings file enables a basic Web server that serves files, without any parsing, contained in a specific directory, via HTTP and HTTPS, only to clients in the trusted range of IP addresses.
| |
| − | ----
| |
| − |
| |
| − | === hsyco/motion ===
| |
| − | Contains the images of every single frame recorded from each camera. The motion directory contains a distinct subdirectory for each camera, named as the cameras ids defined in hsyco.ini. In these directories the files are organized in two additional subdirectory levels. HSYCO automatically manages these directories and the individual files.
| |
| − |
| |
| − | {{note|In order to avoid any malfunction in the reproduction and, potentially, in the recording of the events you should not partially delete the files. If needed, it is possible to delete all the files of a camera and then restart HSYCO so that the index of the images can be correctly updated.}}
| |
| − |
| |
| − | HSYCO will automatically erase the files and their corresponding subdirectories after the time of images storage has expired, as set in hsyco.ini for each camera.
| |
| − |
| |
| − | Moreover, the older frames are automatically erased before their times of expiration if the space available on disc drops below a safe margin.
| |
| − | ----
| |
| − |
| |
| − | === hsyco/logs ===
| |
| − | Contains the log files generated by HSYCO. The information details contained in the log files depend on the log level settings defined in hsyco.ini. All the relevant events detected from the field, the commands sent, the users access information and errors can be traced.
| |
| − |
| |
| − | When starting HSYCO the information corresponding to the execution of the different HSYCO modules will be logged. Some of the most important log messages are listed in the Appendix chapter.
| |
| − |
| |
| − | HSYCO writes a separate log file each day, in a different directory for each year, in the '''''MMGG-message.log'''' format. For example, the log file for the 12th April 2012 will be hsyco/logs/2012/0412-message.log.
| |
| − |
| |
| − | If anti-intrusion systems are integrated with HSYCO, the file '''security.log''' will be written too, in the same directories as the daily log files. This file contains the list of all the events concerning activation, deactivation and alarms on the anti-intrusion systems.
| |
| − |
| |
| − | The log files can be removed anytime without causing any problem. HSYCO does not provide an automatic procedure to erase the log files.
| |
| − | ----
| |
| − |
| |
| − | === hsyco/ir ===
| |
| − | This directory can be empty or might not exist at all. It contains the files with CCF encoded IR commands, to be used when sending IR commands with IRTrans devices.
| |
| − |
| |
| − | These files should have the extension .ccfhex and the name corresponds to the IR database name.
| |
| − |
| |
| − | Each file contains one or more lines per command:
| |
| − |
| |
| − | command_name = hex_ccf_data
| |
| − |
| |
| − | The CCF data for each command is in hexadecimal format, and could be broken in multiple lines.
| |
| − | ----
| |
| − |
| |
| − | === hsyco/dataloggers.ini ===
| |
| − | This file contains the definitions of time slots for data loggers of type counter. Each line sets some rules for a time slot of a data logger, the format to be used is the following:
| |
| − |
| |
| − | datalogger_name; slot_id; time_range; days_of_week; date; rate
| |
| − |
| |
| − | Whenever a counter data logger listed in this file is updated, the rules are matched from top to bottom to establish the time slot the new value belongs to and thus which rate to apply.
| |
| − |
| |
| − | The following table describes each field of a rule line:
| |
| − |
| |
| − | {| class="wikitable"
| |
| − | !Field
| |
| − | !Format
| |
| − | !Description
| |
| − | |-
| |
| − |
| |
| − | |datalogger_name
| |
| − | |string
| |
| − | |specifies which data logger this slot is applied to
| |
| − | |-
| |
| − |
| |
| − | |slot_id
| |
| − | |positive integer
| |
| − | |identifier for the slot. More lines can refer to the same slot identifier
| |
| − | |-
| |
| − |
| |
| − | |time_range
| |
| − | |hh:mm-hh:mm
| |
| − | |specifies the time range in which the slot applies. An asterisk (*) in this field will always result in a match
| |
| − | |-
| |
| − |
| |
| − | |days_of_week
| |
| − | |list of week days
| |
| − | |specifies the week days matched by this rule. The days are identified by a number from 1 (Monday) to 7 (Sunday). For instance, writing “135” into this field will result in a match on Mondays (1), Wednesdays (3), and Fridays (5). An asterisk in this field will always result in a match
| |
| − | |-
| |
| − |
| |
| − | |date
| |
| − | |yyyy/mm/dd
| |
| − | or
| |
| − | yyyy/mm/dd-yyyy/mm/dd
| |
| − | |specifies the date or the date range in which the slot applies. In case of date ranges (yyyy/mm/dd-yyyy/mm/dd) the starting date or the ending date can be replaced by an asterisk indicating that this rule will apply respectively until or from the specified date. For instance the date range “*-2000/12/31” will match all the dates preceding and including December 31st 2000. If the exact date format is used (yyyy/mm/dd) then each field can be replaced by an asterisk which will match every year, month, or day. For instance “*/12/25” will match December 25th of every year. An asterisk in this field will always result in a match
| |
| − | |-
| |
| − |
| |
| − | |rate
| |
| − | |positive float number
| |
| − | |specifies the rate (i.e. the multiplicative factor) to be applied for this time slot.
| |
| − | |-
| |
| − | |}
| |
| − | ----
| |
| − | === hsyco/data ===
| |
| − | HSYCO has an integrated SQL database engine (HSQLDB - HyperSQL DataBase) you can use in your applications via the standard JDBC API.
| |
| − |
| |
| − | The database that HSYCO uses is called “hsyco” and its files are saved in the data/ directory under the base directory. We consider the data/ directory a reserved HSYCO path and discourage the use of it for storing user’s databases or in general for any customized purpose.
| |
| − | ----
| |
| − | === hsyco/Scripts ===
| |
| − | This directory can be empty or might not exist at all. It contains a copy of operating system specific scripts needed for the automatic execution of HSYCO when the server is started<sup>[[#note3|[Note 3]]]</sup>.
| |
| − |
| |
| − | In this directory it is also possible to write additional scripts called by the customized code in user.java.
| |
| − |
| |
| − | <span id="note3">
| |
| − | ;Note 3 : HSYCO SERVER is based on a Linux Ubuntu 12.04 LTS Server distribution. This version uses the Upstart system for the task and services management of the operating system. The configuration file is hsyco.conf. It can be found in the /etc/init directory and allows Upstart to correctly manage the execution of HSYCO.
| |
| − | </span>
| |
| − | ----
| |
| − |
| |
| − | === hsyco/drivers ===
| |
| − | HSYCO offers a development framework to easily build your own I/O server, written in Java, so you can interface with external systems that are not part of the built-in library of supported systems.
| |
| − |
| |
| − | Each driver has a dedicated sub-directory under the “drivers” directory in HSYCO’s root directory.
| |
| − |
| |
| − | See the Custom I/O Drivers Development chapter for additional information.
| |
| − | ----
| |
| − |
| |
| − | === hsyco/plugins ===
| |
| − | HSYCO allows you to bundle both the user interface design and the application code in one package that is easier to distribute and install.
| |
| − |
| |
| − | Each plugin has a dedicated sub-directory under the “plugins” directory in HSYCO’s root directory.
| |
| − |
| |
| − | See the Plugins Applications Development chapter for additional information.
| |
| | | | |
| | == Software License Key == | | == Software License Key == |
HSYCO SERVER ships pre-installed with the latest version of the HSYCO software, on a Linux Ubuntu 12.04 LTS Server distribution stripped of all not-essential services.
The Oracle Java SE Runtime Environment version 7 is also installed. No other software is required.
This chapter describes the access procedures for the basic management of the system and the structure of HSYCO’s installation and configuration files.
Initial Set-Up
There are two standard hardware configurations, a compact server with one Ethernet port and one Serial port, and a larger, expandable server with two Ethernet ports and four serial ports.
HSYCO SERVER is configured with the following default network configuration:
- IP address: 192.168.0.50
- Net mask: 255.255.255.0
- Default Gateway: 192.168.0.1
- DNS: 192.168.0.1
The IP address 192.168.0.50 will be used from now on in all the examples as the HSYCO SERVER address.
On the two Ethernet ports server, the port which is usually configured is the one next to the USB ports, shown as LAN1. The Ethernet port LAN2, on the right, works but it is not configured.
The Configuration Console
HSYCO Server provides a simple low-level maintenance console, used to reboot the system, reset its settings or restore the whole system to the original factory configuration.
This console is not used for normal operations.
The console is available using a keyboard and a monitor connected to the VGA/DVI/HDMI video out connector.
Server Configuration Console

1) Reboot the system
2) Halt the system
3) Stop HSYCO Server
4) Start HSYCO Server
5) Restore network configuration to factory defaults (192.168.0.50)
6) Delete all PINs and file server password and restore default values
7) Restore database to factory defaults. All data will be lost
8) Restore system software to factory defaults. All data will be lost
Type a function number and press Enter [1, 2, 3, 4, 5, 6, 7, 8]:
Type the desired function number and Enter, then press Y to confirm after the beeps (the system will sound a number of beeps, corresponding to the function number; this should allow you to access the console functions using the keyboard and audio feedback only, without a monitor).
Function 1 performs the operating system shutdown, followed by a reboot.
Function 2 performs the operating system shutdown and halts the system. You should turn it off then back on to restart.
Function 3 and 4 are used to temporarily stop the HSYCO Server process, and to restart it.
Use functions 5 to 8 with caution. These function will delete configuration settings, user data, and security settings of the system. They could allow a local user with physical access to the server, unrestricted access to your data.
Function 5 restores the factory default network configuration. If you make a mistake while setting the network parameters, preventing access to the server via the network connection, you can use this function to reset the configuration and regain access to the server.
Function 6 removes all users’ PIN and PUK codes, restoring the default 00000 administrator enabled PIN. It also reset the operating system password to its default.
Function 7 deletes all data in the HSYCO database, including persistent variables.
Function 8 performs a full factory reset, returning the system to the HSYCO version and settings as shipped, removing all custom data, configuration and programs.
The Administration Pages
HSYCO SERVER is pre-configured with a system’s management application that gives you access to the administration functions, including the ability to change the network settings and the operating system’s password, and HSYCO users management.
The protection of any system from unauthorized access is extremely important.
HSYCO uses several security mechanisms, and it is therefore safe to use through the Internet or inside a local network.
HSYCO default configuration only accepts Web requests through the HTTPS secure protocol, while access via HTTP is disabled.
Furthermore, to protect against malicious service discovery robots, HSYCO does not answer to Web requests where only the server address is defined, for example https://192.168.0.50, but requires an extended URL, which must include an access key, called URLKey, defined in the general system configuration parameters.
 The factory default URLKey is hsycoserver.
The URLKey is not a secret password, but only an additional protection feature.
To access the system’s management application, simply called Manager from now on, enter the following URL in your Web Browser:
https://192.168.0.50/hsycoserver/manager
Because the SSL certificate used to secure the communication between the Web Browser and HSYCO SERVER is self-generated, you will be asked to accept the server’s certificate.
On the iPod touch, iPhone or iPad press Continue, on other browsers follow the dialog boxes to permanently accept the certificate.
You will see the PIN and PUK authentication page. Enter the default PIN and PUK, and press OK:
PIN: 0000
PUK: 00000 0000 00000
The default pre-configured PIN and PUK are the same for all HSYCO SERVERS, to let you conveniently access the user interface during the initial installation. Both the PIN and PUK should be changed immediately to different, hard to guess numbers.
Press the Admin icon in the Manager’s main menu to access the Users, System Password, Network and Clock settings functions.
The Manager
The Manager is the Web-based toolkit of applications that you will use to create customized graphic user interfaces and access all system’s configuration files.
Software License Key
The license.txt file contains the software license key needed to unlock HSYCO. The first time HSYCO is started, or in case this file is removed before start, HSYCO creates a new file containing the encrypted code that univocally identifies the hardware where the software runs. In order to allow the correct execution of HSYCO the file should contain the software license key, issued by Home Systems Consulting, specific to every single computer.
The hardware identification code is based on the hardware components installed on the server. For example, by replacing or adding network cards the code changes and therefore the software license key will be no longer valid for the new configuration.
If the license key is not in the file, or if it is not correct, HSYCO disables all the access functions to the field devices, keeping only the Web Server working. It will be therefore possible to access the Web pages, but not to execute any action on or interface to the systems connected to HSYCO.
The possible error messages related to the software license are written in the daily log files.
The content of license.txt, generated by HSYCO and containing only the hardware identification code is the following:
#Generated by HSYCO CONTROLLER 3.3.0
#Tue Dec 10 11:49:06 CET 2013
hwid=2080334b6283f450283bd4bbc3389bf66dc03dda
To unlock HSYCO features, replace the license.txt file generated by HSYCO at the time of its first execution with the license.txt version with the key provided by Home Systems Consulting. The file and the key are automatically recognized within a few seconds, it is therefore not necessary to restart HSYCO.
This is an example of the complete software license key file:
#Generated by HSYCO LICENSE MANAGER 3.3.0
#Tue Dec 10 12:20:00 CET 2013
name=Company Name
hwid=2080334b6283f450283bd4bbc3389bf66dc03dda
key=302D021500898B20F13ABE66DF3D2577809C6A53343A23A5CD0214540FD580A1E3DA1CBEB18D11E98CAAE453D402BF
Access to the Operating System
The configuration of the operating system only needs one administrator user, whose login is hsyco.
The password initially configured for the hsyco user is hsycoserver.
In order to guarantee the system safety and to prevent any unauthorized access it is essential to modify the access password of the HSYCO user before installing the system onto any not-secure LAN network.
The SSH secure protocol is used to access the operating system’s console and, if needed, to manage files. The SSH protocol encrypts all traffic and can be safely used for remote management. If the network has a firewall it might be necessary to open port TCP 22 and configure traffic forwarding towards the HSYCO SERVER IP address.
HSYCO is installed in the home directory of the hsyco user, /home/hsyco.
In this directory, the subdirectory ./hsyco contains the software, the configuration files, custom Java programs, logs and recorded images from cameras.
Several software programs are available for the SSH access on Microsoft Windows, in particular PuTTY[Note 4] to access the console, and Bitvise Tunnelier[Note 5] and WinSCP[Note 6] to access files through SFTP.
On Apple Mac OS X the SSH access is integrated in the operating system and directly usable through Terminal, while Cyberduck[Note 7] is one of the most widespread utilities to manage files through SFTP.
- Note 4
- http://www.chiark.greenend.org.uk/~sgtatham/putty/download.html
- Note 5
- http://www.bitvise.com/download-area
- Note 6
- http://winscp.net/eng/index.php
- Note 7
- http://cyberduck.ch/
Start and Stop the HSYCO Server
HSYCO starts automatically with the operating system when the server is turned on. The execution of HSYCO is signaled by three consecutive high-pitch beeps.
HSYCO also restarts automatically with every change to the hsyco.ini, hsyco.jar and com/hsyco/user.class files. In this case the restart is also signaled by three beeps.
To manually stop HSYCO, access the console via SSH:
ssh hsyco@192.168.0.50
and execute the command:
sudo stop hsyco
To start HSYCO, execute:
sudo start hsyco
Finally, to verify the current state of HSYCO execute:
sudo status hsyco
If HSYCO is running, the answer to the command will be something like:
hsyco (start) running, process ...
Access to Files
To guarantee an easy access to files, HSYCO SERVER makes the main directory available through a standard file server (network disk) service. The name of the service is hsyco. To access the file server you should use the same hsyco user and password provided to access the operating system.
Access to Files on Microsoft Windows
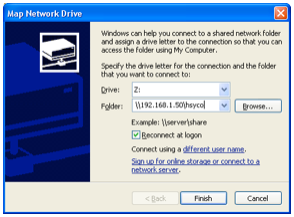
In order to connect a Microsoft Windows system to the HSYCO SERVER shared network folder, select Tools > Map network drive from the Explorer menu.
Type \\192.168.0.50\hsyco in the field Folder and press Finish.
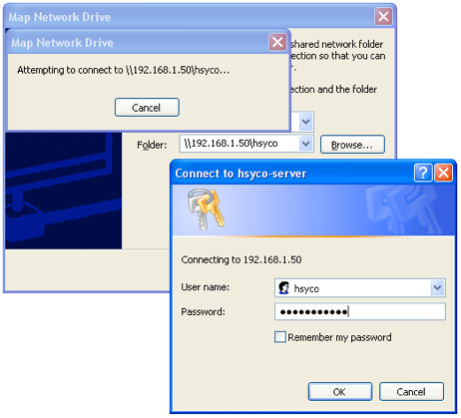
Then, insert the user name (hsyco, as before) and password (initially hsycoserver, that you can modify as already described) and press OK.
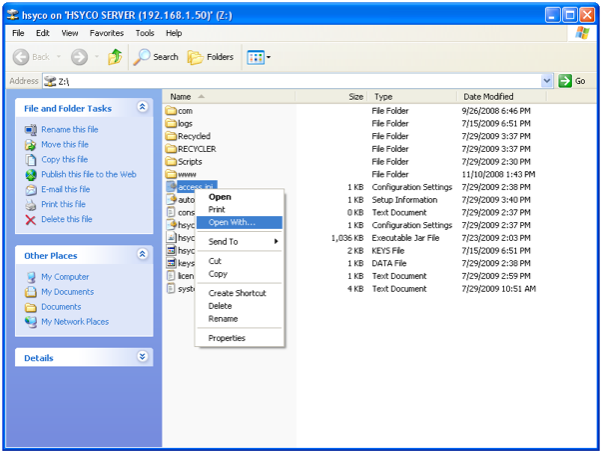
All the HSYCO files are available and accessible in the shared folder window, and you have full read and write permissions on them.
In order to guarantee the highest safety and protection of HSYCO from any unauthorized access, you should disconnect the shared folder when not in use and avoid saving
[Note 8] the password for automatic access.
To manually edit the content of the files directly from the shared folder, use the WordPad application, and not the Notepad application, the latter cannot correctly manage the text files format.
To open the files using WordPad, right click on the file, then select Open with... and WordPad, if it appears in the menu, or go to Programs and choose WordPad in the list of available applications.
- Note 8
- Do not select the Remember my password option in the window where the username and password are required.
Access to Files on Mac OS X
In order to connect an Apple Mac OS X system to the HSYCO SERVER file server, select Go > Connect to Server from the Finder menu.
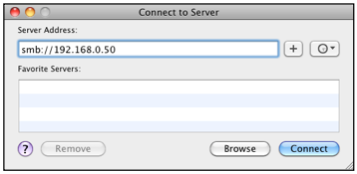
In the Server Address field insert smb://192.168.0.50 and press Connect.
Then, insert the username (hsyco) and password (initially hsycoserver, that you can modify as already described) and press Connect.
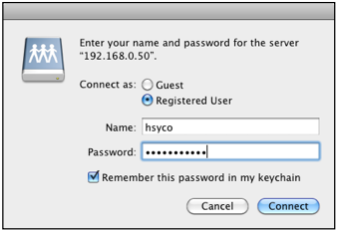
In order to guarantee the highest safety and protection of HSYCO from any unauthorized access, we advise you to disconnect the shared folder when not in use and not to save the password in the Mac keychain.


