Difference between revisions of "IonoPi"
Jump to navigation
Jump to search
(Created page with "[http://www.sferalabs.cc/iono/ Iono] is a general-purpose, professional input/output module based on a standard Arduino microcontroller. File:Iono_ethernet.png|200px|thumb|...") |
|||
| (16 intermediate revisions by one other user not shown) | |||
| Line 1: | Line 1: | ||
| − | [http://www.sferalabs.cc/iono/ Iono] is a | + | [http://www.sferalabs.cc/iono-pi/ Iono Pi] is a versatile I/O module that combines several digital and analog input lines, power relay outputs and support for standard interfaces, typical of modern PLCs, with the powerful computing core of the Raspberry Pi. |
| − | [[File: | + | [[File:iono_pi_module_board.png|200px|thumb|iono Pi]] |
| − | This driver provides support for iono | + | This driver provides support for iono Pi pre-installed with the [http://github.com/sfera-labs/sfera Sfera Framework] and the [http://github.com/sfera-labs/sfera-driver-iono-pi Sfera Driver] for Iono Pi. |
| − | |||
[[Category:I/O Server]] | [[Category:I/O Server]] | ||
== HSYCO Configuration == | == HSYCO Configuration == | ||
| − | Add a IONO I/O Server in the [[Settings#I/O Servers|I/O Servers section of the Settings]] and set its parameters: | + | Add a IONO Pi I/O Server in the [[Settings#I/O Servers|I/O Servers section of the Settings]] and set its parameters: |
=== Communication === | === Communication === | ||
| Line 16: | Line 15: | ||
=== High Availability === | === High Availability === | ||
| − | *'''Shutdown when inactive''': defaults to | + | *'''Shutdown when inactive''': defaults to false. |
=== Options === | === Options === | ||
| Line 28: | Line 27: | ||
|- | |- | ||
| − | |rowspan="2"| | + | |rowspan="2"|https |
| − | |rowspan="2"| | + | |rowspan="2"|false |
|true | |true | ||
| − | | | + | |use HTTPS to communicate with Iono Pi |
|- | |- | ||
|false | |false | ||
| − | | | + | |use HTTP to communicate with Iono Pi |
|- | |- | ||
| − | |rowspan="2"| | + | |rowspan="2"|startupevents |
| − | |rowspan="2"| | + | |rowspan="2"|true |
| − | | | + | |false |
| − | |the | + | |generate IO events also during the driver’s start-up phase |
| − | |||
| − | |||
| − | |||
| − | |||
| − | |||
| − | |||
| − | |||
| − | |||
| − | |||
| − | |||
| − | |||
| − | |||
| − | |||
| − | |||
| − | |||
| − | |||
| − | |||
| − | |||
| − | |||
| − | |||
| − | |||
| − | |||
| − | |||
| − | |||
| − | |||
| − | |||
| − | |||
| − | |||
|- | |- | ||
| + | |false | ||
| + | |start generating events only after HSYCO is aligned with the current status of the system | ||
| − | |||
| − | |||
| − | |||
| − | |||
| − | |||
| − | |||
| − | |||
| − | |||
| − | |||
| − | |||
| − | |||
|} | |} | ||
== Datapoints == | == Datapoints == | ||
| − | |||
| − | |||
{| class="wikitable" | {| class="wikitable" | ||
| Line 109: | Line 69: | ||
|- | |- | ||
| − | |rowspan="4" | | + | |rowspan="3" |driverstate |
| + | |init | ||
| + | |R | ||
| + | |Sfera driver is initializing | ||
| + | |- | ||
| + | |quit | ||
| + | |R | ||
| + | |Sfera driver quit | ||
| + | |- | ||
| + | |running | ||
| + | |R | ||
| + | |Sfera driver is running (normal state) | ||
| + | |||
| + | |- | ||
| + | |||
| + | |rowspan="4" |led | ||
| + | |rowspan="2" |0 | ||
| + | |R | ||
| + | |LED L1 is off | ||
| + | |- | ||
| + | |W | ||
| + | |turn LED L1 off | ||
| + | |- | ||
| + | |rowspan="2" |1 | ||
| + | |R | ||
| + | |LED L1 is on | ||
| + | |- | ||
| + | |W | ||
| + | |turn LED L1 on | ||
| + | |||
| + | |- | ||
| + | |||
| + | |rowspan="4" |o<1-4> | ||
|rowspan="2" |0 | |rowspan="2" |0 | ||
|R | |R | ||
| − | |relay < | + | |relay <1-4> is off |
|- | |- | ||
|W | |W | ||
| − | |switch off relay < | + | |switch off relay <1-4> |
|- | |- | ||
|rowspan="2" |1 | |rowspan="2" |1 | ||
|R | |R | ||
| − | |relay < | + | |relay <1-4> is on |
|- | |- | ||
|W | |W | ||
| − | |switch on relay < | + | |switch on relay <1-4> |
|- | |- | ||
| − | |rowspan="2" |di< | + | |rowspan="4" |oc<1-3> |
| + | |rowspan="2" |0 | ||
| + | |R | ||
| + | |open collector output <1-3> is off (not grounded) | ||
| + | |- | ||
| + | |W | ||
| + | |switch off open collector output <1-3> | ||
| + | |- | ||
| + | |rowspan="2" |1 | ||
| + | |R | ||
| + | |open collector output <1-3> is on (grounded) | ||
| + | |- | ||
| + | |W | ||
| + | |switch on open collector output <1-3> | ||
| + | |||
| + | |- | ||
| + | |||
| + | |rowspan="2" |di<1-6> | ||
|0 | |0 | ||
|R | |R | ||
| − | |digital input < | + | |digital input <1-6> is low |
|- | |- | ||
|1 | |1 | ||
|R | |R | ||
| − | |digital input < | + | |digital input <1-6> is high |
|- | |- | ||
| − | | | + | |ai<1-4> |
|<val> | |<val> | ||
|R | |R | ||
| − | |analog input < | + | |analog input <1-4> is reading a voltage equal to <val> (in Volts) |
|- | |- | ||
| − | | | + | |wiegand.<1-2> |
|<val> | |<val> | ||
|R | |R | ||
| − | | | + | |Wiegand input <1-2> value as an unsigned integer in base 16 (hex) |
|- | |- | ||
| − | | | + | |onewire.bus.<id> |
|<val> | |<val> | ||
| − | | | + | |R |
| − | | | + | |1-Wire device <id> value |
|} | |} | ||
| Line 160: | Line 169: | ||
== User Interface == | == User Interface == | ||
| − | To control a digital output ( | + | To control a digital output (O1 ... O4, OC1 ... OC3, LED), add a [[button]] or a [[buttonicon]] object to your project page and set its address field to the corresponding datapoint: |
| − | [[File: | + | [[File:IonoPi_UI_Button.png|500px|border]] |
== Release Notes == | == Release Notes == | ||
| − | === 3. | + | === 3.6.0 === |
*initial release | *initial release | ||
| Line 172: | Line 181: | ||
| − | ''iono is a registered trademark of Sfera Labs Srl'' | + | ''iono Pi is a registered trademark of Sfera Labs Srl'' |
Latest revision as of 19:36, 12 November 2018
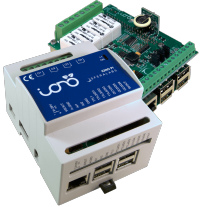
Iono Pi is a versatile I/O module that combines several digital and analog input lines, power relay outputs and support for standard interfaces, typical of modern PLCs, with the powerful computing core of the Raspberry Pi.
This driver provides support for iono Pi pre-installed with the Sfera Framework and the Sfera Driver for Iono Pi.
Contents
HSYCO Configuration
Add a IONO Pi I/O Server in the I/O Servers section of the Settings and set its parameters:
Communication
- IP Address: the IP address assigned to iono;
High Availability
- Shutdown when inactive: defaults to false.
Options
| ID | Default | Values | Description |
|---|---|---|---|
| https | false | true | use HTTPS to communicate with Iono Pi |
| false | use HTTP to communicate with Iono Pi | ||
| startupevents | true | false | generate IO events also during the driver’s start-up phase |
| false | start generating events only after HSYCO is aligned with the current status of the system
|
Datapoints
| ID | Value | R/W | Description |
|---|---|---|---|
| connection | online | R | connection established |
| offline | R | HSYCO can't connect to the device | |
| driverstate | init | R | Sfera driver is initializing |
| quit | R | Sfera driver quit | |
| running | R | Sfera driver is running (normal state) | |
| led | 0 | R | LED L1 is off |
| W | turn LED L1 off | ||
| 1 | R | LED L1 is on | |
| W | turn LED L1 on | ||
| o<1-4> | 0 | R | relay <1-4> is off |
| W | switch off relay <1-4> | ||
| 1 | R | relay <1-4> is on | |
| W | switch on relay <1-4> | ||
| oc<1-3> | 0 | R | open collector output <1-3> is off (not grounded) |
| W | switch off open collector output <1-3> | ||
| 1 | R | open collector output <1-3> is on (grounded) | |
| W | switch on open collector output <1-3> | ||
| di<1-6> | 0 | R | digital input <1-6> is low |
| 1 | R | digital input <1-6> is high | |
| ai<1-4> | <val> | R | analog input <1-4> is reading a voltage equal to <val> (in Volts) |
| wiegand.<1-2> | <val> | R | Wiegand input <1-2> value as an unsigned integer in base 16 (hex) |
| onewire.bus.<id> | <val> | R | 1-Wire device <id> value |
User Interface
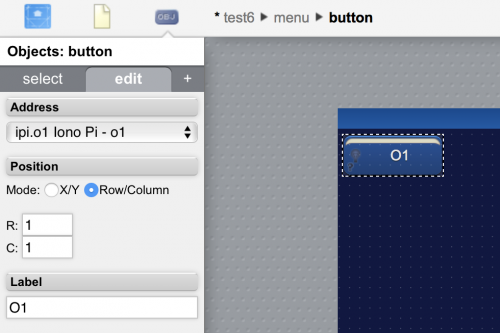
To control a digital output (O1 ... O4, OC1 ... OC3, LED), add a button or a buttonicon object to your project page and set its address field to the corresponding datapoint:
Release Notes
3.6.0
- initial release
iono Pi is a registered trademark of Sfera Labs Srl

