Difference between revisions of "Tutorial5"
| (6 intermediate revisions by the same user not shown) | |||
| Line 1: | Line 1: | ||
[[Category:TUTORIALS]] | [[Category:TUTORIALS]] | ||
| − | This tutorial describes how to create a dummy | + | This tutorial describes how to create a dummy I/O server. |
| + | The DUMMY I/O Server is a virtual server that doesn’t actually connect to any external system, but simulates basic lighting and automation devices. | ||
To access the Manager enter the following URL in your Web Browser: | To access the Manager enter the following URL in your Web Browser: | ||
| Line 8: | Line 9: | ||
If you need more information about the first login to Hsyco please read first this: [[Tutorial1]] | If you need more information about the first login to Hsyco please read first this: [[Tutorial1]] | ||
| − | == Adding a dummy | + | == Adding a dummy I/O server == |
Click on the "Settings" icon and then on the "I/O Servers" icon. | Click on the "Settings" icon and then on the "I/O Servers" icon. | ||
| Line 18: | Line 19: | ||
[[File:Tutorial5-2.png]] | [[File:Tutorial5-2.png]] | ||
| − | Assign the ID "dummy" to this new | + | Assign the ID "dummy" to this new I/O server. |
[[File:Tutorial5-3.png|600px]] | [[File:Tutorial5-3.png|600px]] | ||
| + | |||
| + | Leaving empty the "Options" attributes list means creating 10 virtual lights, dimmers, automations. | ||
| + | |||
| + | == Dummy I/O server and Project Editor == | ||
| + | |||
| + | Open the "Project Editor". | ||
| + | |||
| + | Add a "button" object. | ||
| + | |||
| + | [[File:Tutorial5-4.png]] | ||
| + | |||
| + | Select "dummy.autom.1" from the "Address" drop down menu. | ||
| + | |||
| + | [[File:Tutorial5-5.png]] | ||
| + | |||
| + | Assign a label to the new "button" object | ||
| + | |||
| + | [[File:Tutorial5-6.png]] | ||
| + | |||
| + | Now add another "button" linked to datapoint "dummy.light.1" | ||
| + | |||
| + | Add a "dimmer" object. | ||
| + | |||
| + | [[File:Tutorial5-7.png]] | ||
| + | |||
| + | Select "dummy.autom.1" from the "Address" dropdown menu. | ||
| + | |||
| + | |||
| + | Save the project and open a new tab in your browser with the following URL: | ||
| + | |||
| + | <nowiki>https://192.168.0.50/hsycoserver/test</nowiki> | ||
Latest revision as of 09:30, 30 April 2014
This tutorial describes how to create a dummy I/O server. The DUMMY I/O Server is a virtual server that doesn’t actually connect to any external system, but simulates basic lighting and automation devices.
To access the Manager enter the following URL in your Web Browser:
https://192.168.0.50/hsycoserver/manager
If you need more information about the first login to Hsyco please read first this: Tutorial1
Adding a dummy I/O server
Click on the "Settings" icon and then on the "I/O Servers" icon.
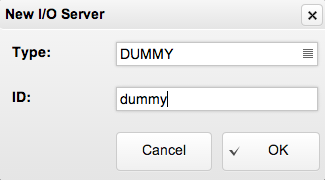
Select "DUMMY" from the drop down menu.
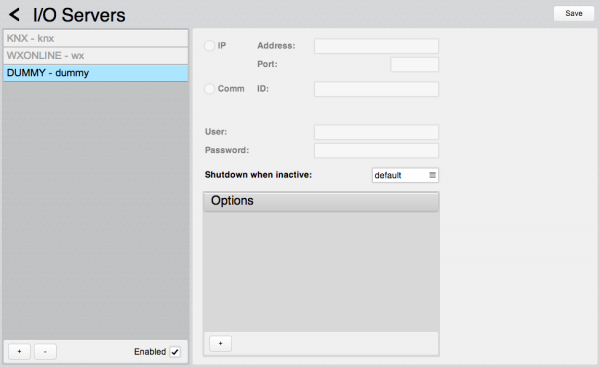
Assign the ID "dummy" to this new I/O server.
Leaving empty the "Options" attributes list means creating 10 virtual lights, dimmers, automations.
Dummy I/O server and Project Editor
Open the "Project Editor".
Add a "button" object.
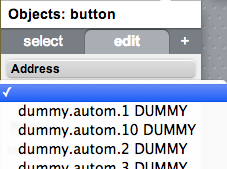
Select "dummy.autom.1" from the "Address" drop down menu.
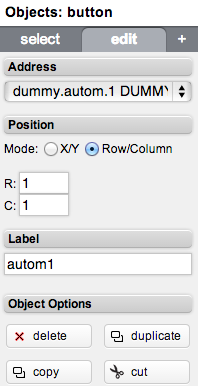
Assign a label to the new "button" object
Now add another "button" linked to datapoint "dummy.light.1"
Add a "dimmer" object.
Select "dummy.autom.1" from the "Address" dropdown menu.
Save the project and open a new tab in your browser with the following URL:
https://192.168.0.50/hsycoserver/test


