Difference between revisions of "Notifications Utility"
(→Groups) |
(→Log) |
||
| Line 76: | Line 76: | ||
To perform a search specify a date range and, optionally, the other filter options and click on '''Refresh'''. The result of the query can be sent via e-mail in CSV format clicking on the envelop icon. | To perform a search specify a date range and, optionally, the other filter options and click on '''Refresh'''. The result of the query can be sent via e-mail in CSV format clicking on the envelop icon. | ||
| + | |||
| + | == Events == | ||
| + | The application generates USER events that can be used to add custom logic to alarm events. | ||
| + | |||
| + | Whenever a new notification is created, the following USER event is triggered: | ||
| + | |||
| + | <pre> | ||
| + | alarm.new = <notification_message> | ||
| + | </pre> | ||
| + | |||
| + | For each datapoint with alarm conditions defined, the following USER events are triggered: | ||
| + | |||
| + | <pre> | ||
| + | alarm.<datapoint_id> = 1 // when at least an alarm condition on the datapoint is true | ||
| + | alarm.<datapoint_id> = 0 // when all alarm conditions on the datapoint are false | ||
| + | </pre> | ||
Revision as of 18:13, 19 November 2015
This plugin provides an application for monitoring and configuring notifications for installations comprising heterogeneous sensors and I/O devices managed by several users possibly divided into groups.
The application allows for the specification of alarm conditions with different levels, generates logs and notifies users via e-mail and/or SMS text messages.
Before using the plugin, configure all the I/O Servers needed and make sure they all communicate correctly with HSYCO.
To view the Notifications Utility interface go to the URL of the "notif" project on your server; for instance https://192.168.0.50/hsycoserver/notif.
The application is divided in the following sections:
Groups
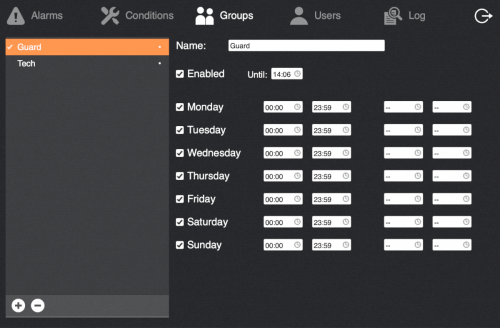
A group represents a set of users that should receive the same notifications.
Create/delete groups using the +/- buttons at the bottom of the list and enter a name.
For each group you can select the days it is active and, for each day, up to 2 time intervals in which it is active. When a group is active, the users belonging to the group will receive alarm notifications targeted for such group.
Currently active groups display a "•" symbol next to their names.
Users
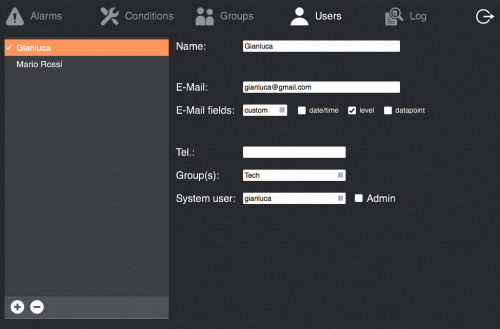
Create/delete users using the +/- buttons at the bottom of the list and enter a name.
- E-Mail: if specified, alarms notifications for the user will be sent to the specified address
- Tel.: if HSYCO is provided with a GSM I/O Server you can specify the phone number of the user that will be used to send SMS text notifications to. Use the same number format described in the GSM I/O Server documentation
- Group(s): select the group(s) the user belongs to
Conditions
This section is where you define the datapoints to be monitored by the application and specify the conditions that will trigger a notification.
A datapoint can be either an I/O Served datapoint or a system variable.
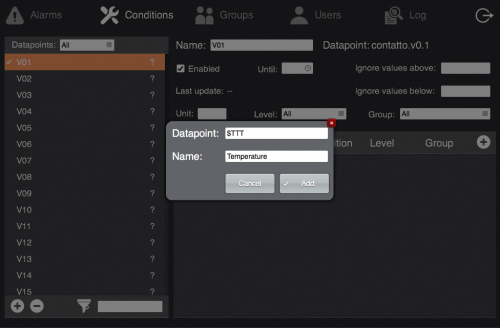
To add a datapoint click on the + button at the bottom of the list and specify the datapoint ID and a descriptive name.
To add an I/O Server datapoint just specify its ID, for variables use the upper-case name prefixed by '$'.
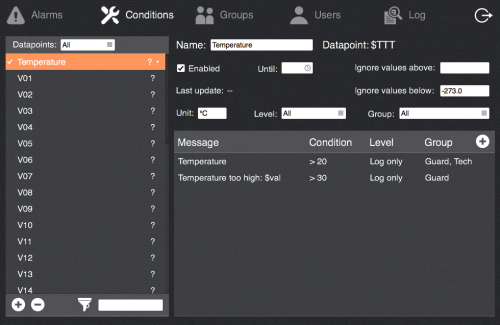
After you added a datapoint you can optionally specify a unit of measure and upper/lower boundaries for its value to discard error values.
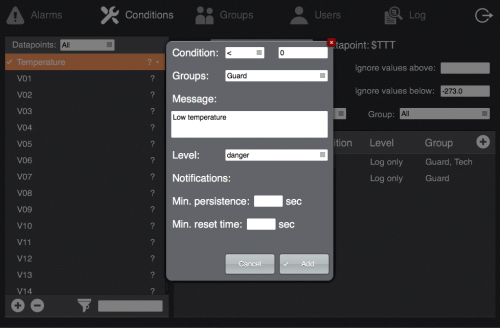
Then you can add notification conditions:
- Condition: select among the available comparisons, i.e. equals (=), different from (!), lower than (<) or greater than (>) and enter the reference value
- Groups: select the groups the notification is targeted to
- Message: enter the notification message. You can use the "$val" placeholder that will be replaced with the value that triggered the notification
- To avoid repeated notifications you can specify a time interval after an alarm condition is exited in which new notifications will be suppressed
- Level: select the level of the condition. The level "Log only" will cause the condition to be added to the log when occurring, but no alarm will be displayed and no notification will be sent. The other levels are customisable and must be specified in the file "notifications_utility/config/levels.ini" as follows.
- Add a single line listing the levels values (1 ... N) and the corresponding names. Here is a valid configuration:
1=warning; 2=danger; 3=system
Datapoints for which alarm conditions have been defined show a "•" symbol next to their names in the list. If one of the conditions is active, both the condition and the device name turn red.
Alarms
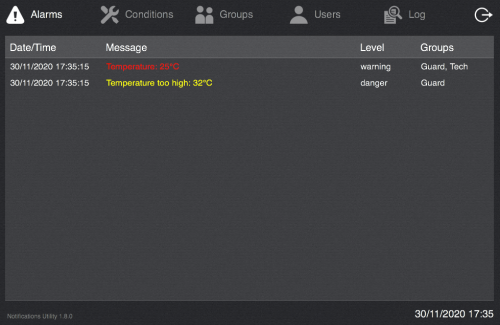
The main page of the application shows the ongoing alarms.
When an alarm condition occurs, it is listed in this table and its message will be displayed in red. To acknowledge the alarm click on the entry and confirm the reset.
If the alarm has been acknowledged, but the condition that triggered it is still persisting, then its message will turn yellow, otherwise it will be removed from the list.
Log
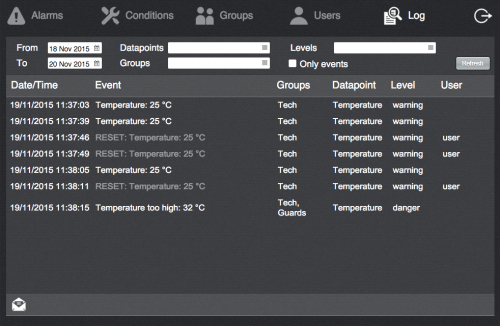
This page lets you browse and filter the log database.
The database contains alarm events and reset actions on alarm notifications.
To perform a search specify a date range and, optionally, the other filter options and click on Refresh. The result of the query can be sent via e-mail in CSV format clicking on the envelop icon.
Events
The application generates USER events that can be used to add custom logic to alarm events.
Whenever a new notification is created, the following USER event is triggered:
alarm.new = <notification_message>
For each datapoint with alarm conditions defined, the following USER events are triggered:
alarm.<datapoint_id> = 1       // when at least an alarm condition on the datapoint is true
alarm.<datapoint_id> = 0       // when all alarm conditions on the datapoint are false
