SSL Certificates for Cryptography
HSYCO supports high-grade cryptography (TLS ECDHE RSA with AES 128 GCM SHA 256, 128 bit keys, TLS 1.2) to protect the communication between the web browser used by HSYCO web interface and the HSYCO web server.
This is considered secure for commercial applications (for example, on-line banking and e-commerce) and for the exchange of classified information.
HSYCO can use either self-generated certificates, or import certificates issued by a Certification Authority (CA).
A Java Virtual Machine version 8 or above is required to fully support HTTPS encryption, and to ensure compatibility with modern Web browsers.
Self-Generated Certificates
When the SSL certificate is generated by HSYCO, and it is therefore not signed by an official Certification Authority (CA) recognized by the Web Browser, it is normal for the browser to display a security message during the first access to the site or periodically at the beginning of a new session.
This message asks the user a confirmation about the reliability of the server with which it is trying to start a secure session; since the certificate is not signed by a known CA, the browser can’t guarantee the identity of the server. By accepting the certificate, the connection is established and it is possible to proceed normally.
Anyway, even when the certificate is generated by HSYCO, all the exchanged data are protected by the AES-256 cryptography, as with signed certificates.
The auto-generated certificate guarantees the same level of cryptographic protection as an equivalent certificate signed by a CA.
The ServerName parameter in the hsyco.ini configuration file specifies the name used to generate the SSL certificate, necessary for the cryptography of the HTTPS Web traffic, and must correspond to the domain name through which HSYCO is accessible via the Internet.
The certificate is contained in the hsyco.keys file.
When HSYCO is started, if this file is not available, a new SSL certificate is automatically generated according to the name defined in ServerName.
Otherwise, HSYCO simply uses the certificate contained in this file, which could have also been generated by an official Certification Authority (CA).
If an official certificate has not been chosen, this file is thus created and managed by HSYCO without any manual intervention.
If the name defined in ServerName is modified, HSYCO will automatically recreate a new hsyco.keys file the next time it restarts.
Importing the Self-Generated Certificate on your Client
With some browsers and operating systems, like Safari on iOS, permanently importing the self-generated certificate in the local keystore could improve HSYCO's gui usability.
If the certificate is stored in the local keystore, the browser will always accept the HTTPS connection to HSYCO without asking for confirmation. On iOS, and in combination with the HTML5 persistent cache, saving the certificate locally will also significantly improve the gui initialization time.
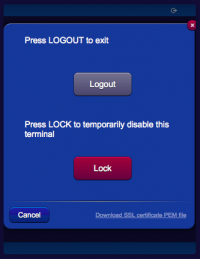
To download the server certificate's public key in PEM format, simply click the link in the logout panel, then follow the browser or operating system's instructions to save the certificate.
Certificates Issued by Certification Authorities
In order to use certificates that are generated by a Certification Authority, you should follow a command line based procedure, using the cryptography tools available in the HSYCO server's base software.
In the following example, we’ll use the StartCom Ltd (http://www.startssl.com/) Certification Authority.
Access to the console via SSH:
ssh hsyco@192.168.0.50
and execute the following commands in HSYCO main directory, in which the hsyco.keys file is located, or better in a temporary directory, from which it will be sufficient to copy hsyco.keys in HSYCO’s main directory at the end of the procedure.
These commands require a password for the protection of the hsyco.keys file and of the certificate contained in it. However, since HSYCO must be able to automatically read this file, the password should be the same for all installations.
Always use the password:
hsycopass
in the following commands.
Since this password is not secret, it is important to remember that the signed certificate could be potentially used by anyone having access to the file.
The protection of the HSYCO console, using a long and complex password for the hsyco user, becomes for this reason even more important.
1) generate the key for the domain name:
keytool -genkey -keyalg rsa -alias hsyco -dname "cn=www.domain.com, o=domain, o=.com" -keystore hsyco.keys
2) create the certificate request file:
keytool -certreq -alias hsyco -file www.domain.com.csr -keystore hsyco.keys
3) import the keys of the chosen CA in the file hsyco.keys:
wget http://www.startssl.com/certs/ca.crt
keytool -import -alias startcom.ca -file ca.crt -keystore hsyco.keys
wget http://www.startssl.com/certs/sub.class1.server.ca.crt
keytool -import -alias startcom.ca.sub -file sub.class1.server.ca.crt -keystore hsyco.keys
4) once you have the certificate signed by the CA, transfer the content in a file, for example:
cat > www.domain.com.signed.crt
5) finally, import the certificate in the hsyco.keys file and copy this file to the HSYCO main directory:
keytool -import -alias hsyco -file www.domain.com.signed.crt -keystore hsyco.keys
