AxisDecoder
The AXIS P7701 Video Decoder provides a simple monitoring solution by enabling analog or digital monitors/projectors to connect to and display live video from Axis network cameras and video encoders.
The HSYCO’s AXISDEC I/O Server not only controls the decoder’s sources selection, but is also able to generate dynamic MJPEG streams that are compatible with this decoder, extending it to display camera grids, non AXIS cameras, and even generic text or images with overlays.
Thanks to these features, you could easily use this decoder as a cost-effective, small, low-power and extremely reliable display driver for basic, customized digital signage applications.
Contents
Axis P7701 Configuration
Source Selection Control
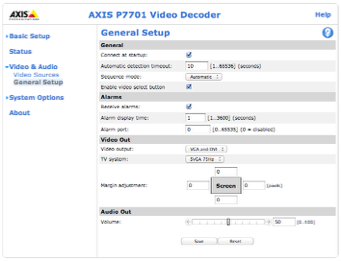
To enable the decoder’s source selection from HSYCO, you have to simply enable the “receive alarm” function:
Configure HSYCO as a video source
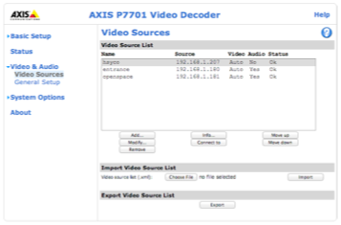
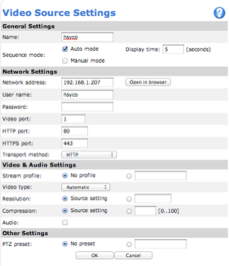
In order to be able to stream video from HSYCO to the P7701 decoder, HSYCO will present itself just like a standard AXIS camera. Just configure the HSYCO server as an ordinary video source:
Enter the HSYCO Server’s IP address and HTTP port number, select HTTP as the “Transport method”, and enter “hsyco” in the user name field. The password field is not used; HSYCO will only accept connections from encoders that are registered as I/O servers in hsyco.ini, and having an IP address in the trustedNet range.
HSYCO Configuration
Options
| ID | Default | Values | Description |
|---|---|---|---|
| streaming | true | true | video streaming is enabled |
| false | video streaming is disabled, you will only be allowed to control the decoder’s source selection | ||
| resolution | 640x480 | <width> X <height> | the display resolution in pixels, up to 1280x720 |
| quality | 0.7 | 0 ... 1.0 | JPEG stream compression quality. Use 1.0 for maximum quality (requires more bandwidth) |
Datapoints
| ID | Value | R/W | Description |
|---|---|---|---|
| command | restart | W | send the reboot command to the video decoder |
| source | <source name> | R | source command sent successfully |
| W | send the source selection command to the decoder. The source name has to be defined in the decoder’s video sources | ||
| <source name>:<message> | R | source command sent successfully | |
| W | send the source selection command to the decoder and a text message that the decoder will display when switching to the new source | ||
| stream | reset | W | see the following section on streaming content to the video decoder |
| on | W | see the following section on streaming content to the video decoder | |
| off | W | see the following section on streaming content to the video decoder | |
| file: <parameters> | W | see the following section on streaming content to the video decoder | |
| cam: <parameters> | W | see the following section on streaming content to the video decoder | |
| text: <parameters> | W | see the following section on streaming content to the video decoder |
Streaming to the Video Decoder
You can stream HSYCO’s cameras video, still images and text to the decoder.
To do this, you simply write to the ID.stream data point. You can dynamically draw multiple graphic objects on the screen. Each new object is drawn on top of those that are already on screen. You can also assign a name to each object; naming objects allows you to replace a single object on screen maintaining the current drawing order.
You also have special commands to reset a screen, removing all objects and drawing a black screen, and to blank an existing screen without removing the objects.
Writing something without assigning a name to the object is equivalent to sending a reset command and then drawing that object.
If you don’t have an Axis Decoder available for testing, you can use a Firefox browser to simulate the decoder. Simply open the Firefox browser on a device having the same IP address as set with the ioServersIP parameter in hsyco.ini, and use the following URL:
http://<HSYCO server’s IP address>:<HTTP port>//axis-cgi/mjpg/video.cgi
Reset
When HSYCO starts and the AXIS decoder connects to HSYCO, it will show a black stream. After you have drawn objects to the decoder’s stream, you can return to a black screen, deleting all objects, using the reset command:
IO video.stream = reset
Off and On
The off command is used to temporarily blank a screen, without removing the objects. It works just like the blank command in video projectors: the screen becomes black, but you can quickly turn it back on with the on command:
IO video.stream = off
IO video.stream = on
Drawing Files
You can draw any image file that you have locally under HSYCO’s root directory. You can set the image’s position on screen and its drawing size, or draw the image in its original size.
Note that resizing a file is a CPU intensive task, so it is advisable to save the files in the actual size that you need for drawing, rather than forcing the I/O server to do the resizing work on the fly.
The file drawing command’s syntax in EVENTS is:
IO <id>.stream = “file[<obj name>]:<file pathname> width:<W> height:<H> top:<Y> left:<X>”
or:
IO <id>.stream = “file[<obj name>]:<on | off>
The on/off command is used to make an existing image visible or invisible.
The only required parameter is the file’s pathname, relative to HSYCO’s root directory so, assuming we have a directory named “images” in the root directory, and the file’s name is “mountains.jpg”, a valid command could be:
IO video.stream = file:images/mountains.jpg
This command simply draws the image full-screen, eventually resizing it to fit the screen’s size, based on the resolution defined in hsyco.ini. For more complex drawings, you will define the object’s names as well as size and position. Size and position are expressed in pixels. The top-left corner has position coordinates 0,0.
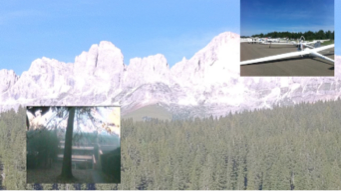
To draw a background image and a smaller image in the top-right portion of the screen, assuming a resolution of 1280x720, use these two commands:
IO video.stream = file[background]:images/mountains.jpg IO video.stream = "file[pip]:images/file1.png width:352 height:288 top:0 left:900"
To change the “pip” image’s visibility:
IO video.stream = file[pip]:off
IO video.stream = file[pip]:on
Note that the second command has its value enclosed in double quotes. This is because it has spaces in it, and without quotes it would not be considered as a single value by the EVENTS interpreter.
Drawing Live Images from Cameras and Grids
Just like you can draw static images, you can also draw HSYCO’s live cameras and grids. The camera drawing syntax in EVENTS is: IO <id>.stream = “cam[<obj name>]:<camera name> width:<W> height:<H> top:<Y> left:<X>” or: IO <id>.stream = “cam[<obj name>]:<on | off>
The on/off command is used to make an existing camera visible or invisible. The <camera name> parameter is mandatory, and should be either a camera name, or gridN, where N is a positive integer, to identify a grid view of multiple cameras, as defined in hsyco.ini. Drawing cameras using a size that is different from the original size will be more resource intensive. To add a camera feed to the stream, use the command: IO video.stream = "cam[pip2]:openspace width:352 height:288 top:400 left:100"
Drawing Text
You can overlay text strings to the stream, choosing the font, style, color, and size of the text.
The text drawing syntax in EVENTS is:
IO <id>.stream = “text[<obj name>]:<text>;; [top:<Y>] [left:<X>] [font:<F>] [style:<[bold],[italic]>] [size:<S>] [color:<C>]”
or:
IO <id>.stream = “text[<obj name>]:<on | off>
The on/off command is used to make an existing text visible or invisible.
Note that the text you are drawing must terminate with two semicolons. After this terminator you can define the optional drawing attributes. If there are no parameters, the two semicolons are not required.
The font attribute is defined as a font name, like “arial”, “helvetica”, “courier” etc. The style can be “bold”, “italic”, or “bold,italic”.
The size is in pixels.
The color can be set using an RGB comma separated numeric notation, with primary color numbers from 0 to 255 (for example, “color:255,0,0” is red), or using color names. The valid names are: black, blue, cyan, darkgray, gray, lightgray, green, magenta, orange, pink, red, white, yellow.
To add text to the stream, use the command:
IO video.stream = "text[text]: Beautiful mountains... ;; top:300 left:200 font:Arial size:48 style:bold,italic color:orange"
Release Notes
3.0.0
- initial release
AXIS is a registered trademark of AXIS Communications.


