Difference between revisions of "Aton"
| Line 537: | Line 537: | ||
=== Aton Object === | === Aton Object === | ||
| − | You can use the [[ | + | You can use the [[Aton_(UI_Object)]] object in the Project Editor to easily and quickly create the Aton user interface. |
{{:Aton_(UI Object)}} | {{:Aton_(UI Object)}} | ||
Revision as of 11:28, 12 February 2014
ATON AH66T is a multi-zone audio system. The integration with HSYCO can be accomplished via direct control through the RS232 port on the module.
The ATON I/O Server in HSYCO supports the integration of more than one unit within the same HSYCO interface.
Contents
Communication
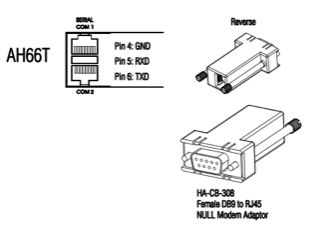
Employ a DE-9 (often called DB-9) female-male RS-232 straight cable to connect the AH66T COM1 port to the serial port on HSYCO SERVER (female DB9 to RJ45 adaptor is included in AH66T packaging).
RS-232 parameters:
| Baud rate | same as set on the module (115200/57600/38400/19200/9600) |
| Data bits | 8 |
| Stop bit | 1 |
| Parity | none |
| Flow control | none |
ATON Configuration
The ATON module must be configured to enable the communication with HSYCO.
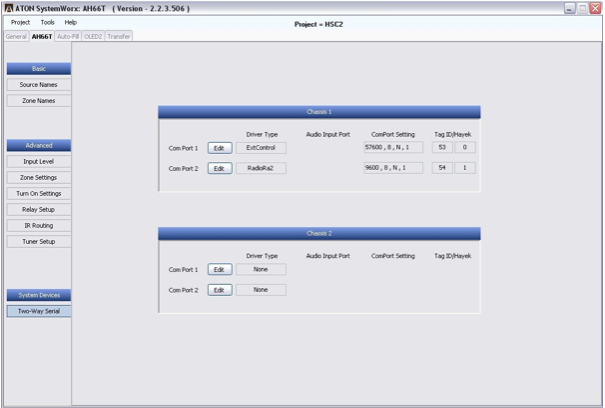
Use the ATON SystemWorx tool to modify the configuration:
![]() Make sure to specify “ExtControl” as Driver Type of COM Port 1, set the serial communication parameters, and transfer the configuration to the module.
Make sure to specify “ExtControl” as Driver Type of COM Port 1, set the serial communication parameters, and transfer the configuration to the module.
HSYCO Configuration
Options
| ID | Default | Values | Description |
|---|---|---|---|
| gui | true | true | enable support for the UI object, UISET actions and USER commands |
| false | disable UI support | ||
| startupevents | false | true | generate IO events also during the driver’s start-up phase |
| false | start generating events only after HSYCO is aligned with the current status of the system | ||
| pollinterval | 1 | n > 0 | the data acquisition interval, in seconds |
| modules | 1 | 1 or 2 | number of modules included in the connected system |
Datapoints
| ID | Value | R/W | Description |
|---|---|---|---|
| connection | online | R | connection established |
| offline | R | HSYCO can't connect to the panel | |
| power | 1 | R | the system is on |
| 0 | R | the system is off | |
| W | turn the system off | ||
| z<n>.power | 1 | R | zone <n> is on |
| W | turn zone <n> on | ||
| 0 | R | zone <n> is off | |
| W | turn zone <n> off | ||
| flip | W | toggle the power status of zone N | |
| z<n>.source | 0 | R | zone <n> is off |
| 1...6 | R | the audio source of zone <n> is set to the reported source number | |
| W | set the audio source of zone <n> to the specified source number | ||
| r1 | R | the audio source of zone <n> is set to the radio of module 1 | |
| W | set the audio source of zone <n> to the radio of module 1 | ||
| r2 | R | the audio source of zone <n> is set to the radio of module 2 | |
| W | set the audio source of zone <n> to the radio of module 2 | ||
| z<n>.volume | off | R | zone <n> is muted |
| W | mute zone <n> | ||
| on | W | un-mute zone <n> | |
| 0...100% | R | the volume level of zone <n> is set to the specified value | |
| W | set the volume level of zone <n> to the specified value | ||
| up | W | increase the volume level of zone <n> | |
| down | W | decrease the volume level of zone <n> | |
| z<n>.mute | 1 | R | zone <n> is muted |
| W | mute zone <n> | ||
| 0 | R | zone <n> is un-muted | |
| W | un-mute zone <n> | ||
| flip | W | toggle the mute status of zone <n> | |
| z<n>.bass | <val> | R | the bass level of zone <n> is set to the specified value (between “-12” and “+12”) |
| W | set the bass level of zone <n> to the specified value (between “-12” and “+12”) | ||
| up | W | increases the bass level of zone <n> | |
| down | W | decreases the bass level of zone <n> | |
| z<n>.treble | <val> | R | the treble level of zone <n> is set to the specified value (between “-12” and “+12”) |
| W | set the treble level of zone <n> to the specified value (between “-12” and “+12”) | ||
| up | W | increases the treble level of zone <n> | |
| down | W | decreases the treble level of zone <n> | |
| z<n>.dnd | 1 | R | “do not disturb” mode is enabled on zone <n> |
| W | enable “do not disturb” mode on zone <n> | ||
| 0 | R | “do not disturb” mode is disabled on zone <n> | |
| W | disable “do not disturb” mode on zone <n> | ||
| flip | W | toggles the “do not disturb” mode on zone <n> | |
| z<n>.loud | 1 | R | the loudness EQ setting is enabled on zone <n> |
| W | enable the loudness EQ setting on zone <n> | ||
| 0 | R | the loudness EQ setting is disabled on zone <n> | |
| W | disable the loudness EQ setting on zone <n> | ||
| flip | W | toggle the loudness EQ setting on zone <n> | |
| z<n>.preamp | fix | R | the pre-amp output of zone <n> is set to fixed |
| W | set the pre-amp output of zone <n> to fixed | ||
| var | R | the pre-amp output of zone <n> is set to variable | |
| W | set the pre-amp output of zone <n> to variable | ||
| flip | W | toggle the status of the pre-amp output of zone <n> | |
| z<n>.mono | 1 | R | the audio mode of zone <n> is set to mono |
| W | set the audio mode of zone <n> to mono | ||
| 0 | R | the audio mode of zone <n> is set to stereo | |
| W | set the audio mode of zone <n> to stereo | ||
| flip | W | toggle the audio mode of zone <n> | |
| z<n>.whm | 1 | R | “whole house music” mode is active on zone <n> |
| W | activate “whole house music” mode on zone <n> | ||
| 0 | R | “whole house music” mode is not active on zone <n> | |
| W | deactivate “whole house music” mode on zone <n> | ||
| flip | W | toggle the “whole house music” mode on zone <n> | |
| m<n>.sti<m> | 1 | R | sense trigger input <m> on module <n> is present |
| 0 | R | sense trigger input <m> on module <n> is absent | |
| m<n>.asi<m> | 1 | R | audio source input <m> on module <n> is present |
| 0 | R | audio source input <m> on module <n> is absent | |
| m<n>.tuner.band | am | R | the tuner of module <n> is set on the AM radio band |
| W | set the tuner of module <n> on the AM radio band | ||
| fm | R | the tuner of module <n> is set on the FM radio band | |
| W | set the tuner of module <n> on the FM radio band | ||
| m<n>.tuner.tune | <xxxx> | R | the tuner of module <n> is tuned on the reported frequency |
| W | tune the frequency of the tuner of module <n> on the specified value | ||
| up | W | increase the frequency of the tuner of module <n> | |
| down | W | decrease the frequency of the tuner of module <n> | |
| m<n>.tuner.seek | up | W | tune module <n> on the next valid station with higher frequency |
| down | W | tune module <n> on the next valid station with lower frequency | |
| m<n>.tuner.group | <group> | R | the selected group of preset radio stations for the tuner of module <n> is set to the reported value (A,B,C, or D) |
| W | set the selected group of preset radio stations for the tuner of module <n> to the specified value (A,B,C, or D) | ||
| m<n>.tuner.mode | preset | R | the tuning mode for the tuner of module <n> is set to preset |
| W | set the tuning mode for the tuner of module <n> to preset | ||
| direct | R | the tuning mode for the tuner of module <n> is set to direct | |
| W | set the tuning mode for the tuner of module <n> to direct | ||
| m<n>.tuner.preset | <xx> | R | the current preset for the tuner of module <n> is the reported value |
| W | tunes module <n> to the specified preset value | ||
| up | W | set the tuner of module <n> to the next higher preset | |
| down | W | set the tuner of module <n> to the next lower preset | |
| save | W | saves the currently selected station on module <n> as a preset | |
| del | W | delete the current preset on module <n> | |
| m<n>.tuner.scan | up | W | scan through presets upwards. The station is automatically changed every 10 seconds until another command is sent |
| down | W | scan through presets downwards. The station is automatically changed every 10 seconds until another command is sent | |
| m<n>.tuner.signal | <val> | R | the signal strength of the currently tuned station corresponds to the reported value |
| m<n>.tuner.mono | 1 | R | the audio mode of the tuner of module <n> is set to mono |
| W | set the audio mode of the tuner of module <n> to mono | ||
| 0 | R | the audio mode of the tuner of module <n> is set to stereo | |
| W | set the audio mode of the tuner of module <n> to stereo | ||
| flip | W | toggle the audio mode of the tuner of module <n> | |
| m<n>.tuner.mdf.name | <text> | R | the name metadata of the current station of the tuner of module <n> is set to the reported text |
| m<n>.tuner.mdf.text | <text> | R | the text metadata of the current station of the tuner of module <n> is set to the reported text |
| m<n>.tuner.mdf.gen | <text> | R | the genre metadata of the current station of the tuner of module <n> is set to the reported text |
| m<n>.tuner.mdf.cl | <text> | R | the name call letters of the current station of the tuner of module <n> is set to the reported text |
| m<n>.tuner.digit | <0...9> | W | send the specified digit for direct tuning to module <n> |
| canc | W | clears any digit previously entered on module <n> | |
| ok | W | sends the enter command to module <n> |
User Interface
Aton Object
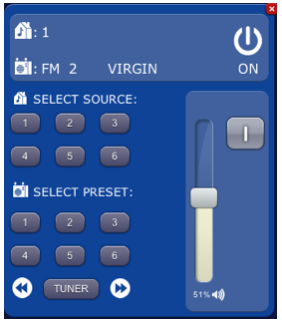
You can use the Aton_(UI_Object) object in the Project Editor to easily and quickly create the Aton user interface.
The user interface for the Aton multi-room system:
The Aton object is listed in the Project Editor’s new object list only when at least one Aton I/O Server is defined.
Parameters
- server id: the server ID
- module:
- zone: zone number of the Aton multi-room system (max 12 zones)
- position: the object's position. Use the pixels or rows and columns coordinates format
Syntax
(aton <server id>; <module>; <zone>; <position>)
E.g.
(aton serverid; module; zone; x10y20)
UISET Actions
| ID | Attribute | Set to | |
|---|---|---|---|
| connection.label.online | visible | true | when datapoint connection = online |
| false | when datapoint connection = offline | ||
| connection.label.offline | visible | true | when datapoint connection = offline |
| false | when datapoint connection = online | ||
USER Commands
To send a user command to the I/O Server just set the name to the ID of a writable (W) datapoint and the parameter to one of the possible values.
For instance, setting the name of a user button to “aton.z1.power” and its param field to “flip”, will result in having a switch for zone 1. Naming it “aton.z1.source” with a valid source as param (e.g. “1”, “2”, or “R1”) will result in a button for setting the audio source of the zone.


