KNX Utility
![]() The KNX Utility application provides a graphical interface to configure a KNX I/O Server. Whenever a KNX I/O Server is defined in HSYCO, the KNX Utility will appear among the applications of the manager.
The KNX Utility application provides a graphical interface to configure a KNX I/O Server. Whenever a KNX I/O Server is defined in HSYCO, the KNX Utility will appear among the applications of the manager.
Open the application and select the KNX I/O Server to be configured in the select field in the top-right corner. If only one KNX I/O Server is defined it will be automatically selected.
Contents
Import an ETS4 project
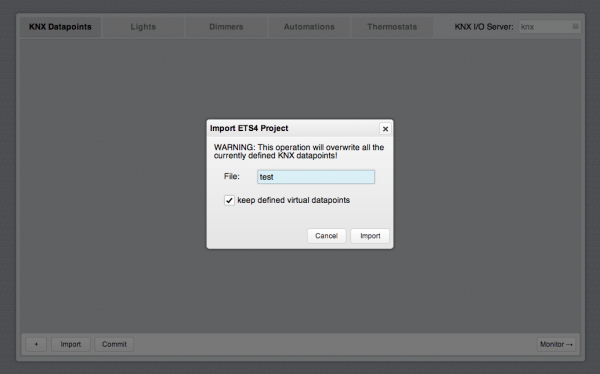
To import an ETS4 project, upload the .knxproj file on HSYCO server, then click on the "Import" button at the bottom of the page and enter the file name (the “.knxproj” extension can be omitted).
The checkbox option “keep defined virtual datapoints” is needed when updating an old KNX installation to an extended one and you need to retain the previously created virtual datapoints.
This procedure will create a datapoint for each group defined in the ETS project with the corresponding DPT type and the default attributes.
Datapoints
A datapoint is the equivalent of a group of the KNX framework. New datapoints can be added employing the import procedure described above or manually, by clicking on the "+" button in the "KNX Datapoints" tab. To modify the attributes of a datapoint click on the corresponding item in the list.
Attributes
- Address: this is the KXN group address corresponding to this datapoint ranging from 0/0/1 to 31/7/255. It must be unique for each defined datapoint
- DPT: the DPT type (ranging from 1 to 18) used to format the datapoint value
- ID: the ID to assign to the corresponding datapoint of the KNX I/O Server. It can be any unique string without spaces
- Description: a textual description of the datapoint. It will be visible in the Project Editor when configuring GUI objects
- Priority: KNX priority to be used when sending frames to this group (low, normal or urgent)
- Read: check this option if the status of this group has to be read
- Icon: attribute for DPT 1 datapoints. It specifies the icon to be used for button objects associated to this datapoint (the values correspond to the ones used in the devices list of systemtopo.txt)
- Thumbnail: attribute for DPT 1 datapoints. It can be used to optionally associate an image or a camera to the datapoint. For images, use the filename of a file located in the www/img directory. To associate a camera, the “cam:<n>” format should be used, where <n> is the camera index starting from 1, based on the order of the camera list in the settings page
Virtual datapoints
KNX lights, dimmers, RGB lights, automations (e.g. blinds) and thermostats need a set of datapoints for control and feedback. It is possible to create a virtual datapoint that links these datapoints so to be treated as a single one which, in turn, can be directly associated to an object in the Web user interface.
Light
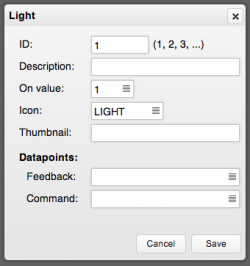
To add a "light" virtual datapoint select the “Lights” tab and click on the “+” button in the bottom bar.
Attributes
- ID: an identification number for this datapoint. It will be used to compose the ID of the corresponding datapoint of the KNX I/O Server (e.g. if ID is set to 1 the corresponding datapoint will be 'light.1')
- Description: a textual description of the datapoint. It will be visible in the Project Editor when configuring GUI objects
- On value: specifies if the 'on' state for this light is represented by a value of '1' or '0'
- Icon: It specifies the icon to be used for button objects associated to this datapoint (the values correspond to the ones used in the devices list of systemtopo.txt)
- Thumbnail: It can be used to optionally associate an image or a camera to the datapoint. For images, use the filename of a file located in the www/img directory. To associate a camera, the “cam:<n>” format should be used, where <n> is the camera index starting from 1, based on the order of the camera list in the settings page
- Feedback datapoint: datapoint representing the on/off feedback. It must be a DPT 1 datapoint
- Command datapoint: datapoint to be addressed when sending on/off commands. It must be a DPT 1 datapoint
Dimmer
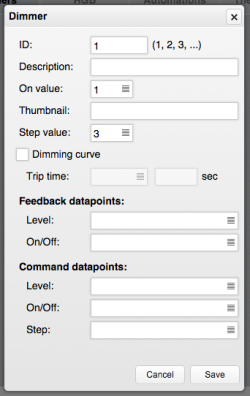
To add a "dimmer" virtual datapoint select the “Dimmers” tab and click on the “+” button in the bottom bar.
Attributes
- ID: an identification number for this datapoint. It will be used to compose the ID of the corresponding datapoint of the KNX I/O Server (e.g. if ID is set to 1 the corresponding datapoint will be 'dimmer.1')
- Description: a textual description of the datapoint. It will be visible in the Project Editor when configuring GUI objects
- On value: specifies if the 'on' state for this light is represented by a value of '1' or '0'
- Step value: specifies the step value to send to the Step command datapoint (if defined) when using a 3button to dim the light
- Dimming curve: enable this option if the dimmer has a timed dimming curve. The buttons connected to this datapoint will show an animated slider when a new brightness level is set.
- Trip time: this option is available only if 'Dimming curve' is enabled. If set to 'Auto' the trip time of the dimming curve will be automatically calculated and adjusted by HSYCO; otherwise it is possible to specify a fixed trip time in seconds.
- Thumbnail: It can be used to optionally associate an image or a camera to the datapoint. For images, use the filename of a file located in the www/img directory. To associate a camera, the “cam:<n>” format should be used, where <n> is the camera index starting from 1, based on the order of the camera list in the settings page
Feedback datapoints:
- Level: datapoint representing the dimming level feedback. It must be a DPT 5 datapoint
- On/Off: datapoint representing the on/off feedback. It must be a DPT 1 datapoint
Command datapoints:
- Level: datapoint to be addressed when sending a dimming level command. It must be a DPT 5 datapoint
- On/Off: datapoint to be addressed when sending an on/off command. It must be a DPT 1 datapoint
- Step: datapoint to be addressed when sending a step command. It must be a DPT 3 datapoint, generally DPT 3.007 (control dimming)
RGB
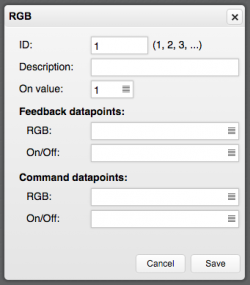
To add a "RGB" virtual datapoint select the “RGB” tab and click on the “+” button in the bottom bar.
Attributes
- ID: an identification number for this datapoint. It will be used to compose the ID of the corresponding datapoint of the KNX I/O Server (e.g. if ID is set to 1 the corresponding datapoint will be 'rgb.1')
- Description: a textual description of the datapoint. It will be visible in the Project Editor when configuring GUI objects
- On value: specifies if the 'on' state for this light is represented by a value of '1' or '0'
Feedback datapoints:
- RGB: datapoint representing the RGB color feedback. It must be a DPT 232 datapoint
- On/Off: datapoint representing the on/off feedback. It must be a DPT 1 datapoint
Command datapoints:
- RGB: datapoint to be addressed when sending an RGB color command. It must be a DPT 232 datapoint
- On/Off: datapoint to be addressed when sending an on/off command. It must be a DPT 1 datapoint
Automation
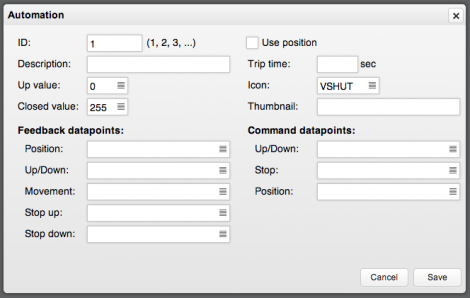
To add an "automation" virtual datapoint select the “Automations” tab and click on the “+” button in the bottom bar.
Attributes
- ID: an identification number for this datapoint. It will be used to compose the ID of the corresponding datapoint of the KNX I/O Server (e.g. if ID is set to 1 the corresponding datapoint will be 'autom.1')
- Description: a textual description of the datapoint. It will be visible in the Project Editor when configuring GUI objects
- Up value: specifies if the 'up' direction for this automation is represented by a value of '1' or '0'
- Closed value: specifies if the 'closed' state for this automation is represented by a value of '255' or '0' of the position feedback
- Use position: specifies wether to use percentage values or not for the read values of the datapoint of the KNX I/O Server. If position is used a button linked to the datapoint will have a slider to control and visualize the position of the automation
- Trip time: if position is used, specifies the trip time (in seconds) from position close to open. If the field is left blank or set to '0' the trip time will be automatically calculated
- Icon: the icon to be used for the buttons associated to this automation datapoint. Available choices are 'vshut' (vertical shut) or 'hshut' (horizontal shut)
- Thumbnail: It can be used to optionally associate an image or a camera to the datapoint. For images, use the filename of a file located in the www/img directory. To associate a camera, the “cam:<n>” format should be used, where <n> is the camera index starting from 1, based on the order of the camera list in the settings page
Feedback datapoints:
- Position: datapoint representing the position feedback. It must be a DPT 5 datapoint
- Up/Down: datapoint representing the up/down direction feedback. It must be a DPT 1 datapoint
- Movement: datapoint representing the movement feedback. It must be a DPT 1 datapoint
- Stop up: datapoint representing the “stop in upper position” state feedback. It must be a DPT 1 datapoint
- Stop down: datapoint representing the “stop in lower position” state feedback. It must be a DPT 1 datapoint
Command datapoints:
- Up/Down: datapoint to be addressed when sending an up/down command. It must be a DPT 1 datapoint
- Stop: datapoint to be addressed when sending a stop command. It must be a DPT 1 datapoint
- Position: datapoint to be addressed when sending a position command. It must be a DPT 5 datapoint
Thermostat
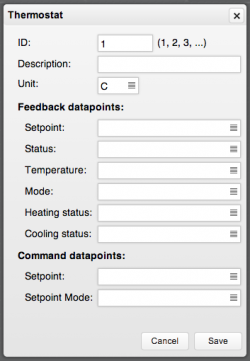
To add an "thermostat" virtual datapoint select the “Thermostat” tab and click on the “+” button in the bottom bar.
Attributes
- ID: an identification number for this datapoint. It will be used to compose the ID of the corresponding datapoint of the KNX I/O Server (e.g. if ID is set to 1 the corresponding datapoint will be 'thermo.1')
- Description: a textual description of the datapoint. It will be visible in the Project Editor when configuring GUI objects
- Unit: The temperature unit to show on the associated tempmini Web object: C, F or K.
Feedback datapoints:
- Setpoint: datapoint representing the temperature setpoint feedback. It must be a DPT 9 datapoint
- Status: datapoint representing the working status feedback of the thermostat (e.g. "comfort", "stand-by", ...). It must be a DPT 5 datapoint
- Temperature: datapoint representing the measured temperature. It must be a DPT 9 datapoint
- Mode: datapoint representing working mode (heating or cooling). It must be a DPT 1 datapoint
- Heating status: datapoint representing the heating level feedback. It must be a DPT 5 datapoint
- Cooling status: datapoint representing the cooling level feedback. It must be a DPT 5 datapoint
Command datapoints:
- Setpoint: datapoint to be addressed when sending a temperature setpoint command. It must be a DPT 9 datapoint
- Setpoint mode: datapoint to be addressed when sending a command to change the working status. It must be a DPT 5 datapoint
KNX Bus Monitor
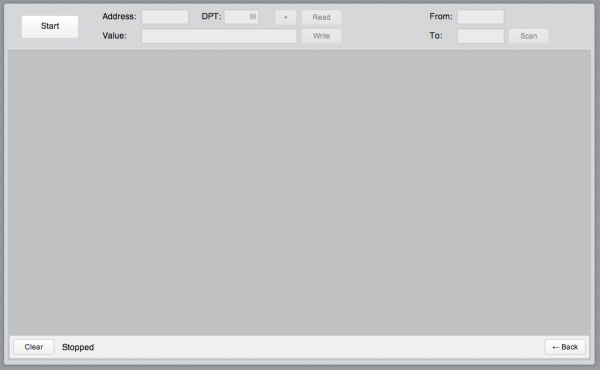
The KNX Utility provides an interface for monitoring the KNX bus which is useful for testing purposes and helps detect the underlying KNX framework structure if unknown. To access the monitor, click on the "Monitor" button in the bottom-right corner and enable the monitor mode by clicking on the “Start” button.
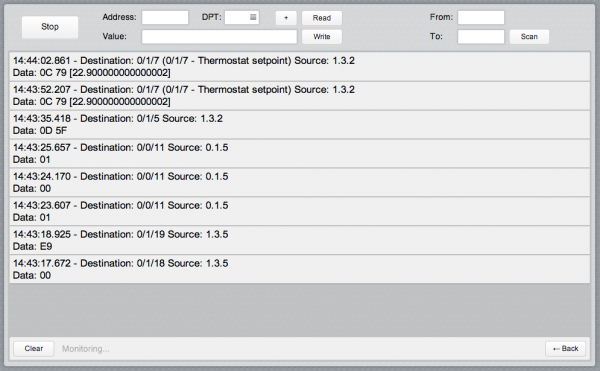
Whenever a frame is detected on the bus, it will be listed in the central panel:
For each frame the following data will be reported:
- The time when the frame has been detected
- The destination group address the frame was sent to (with corresponding ID and description if a datapoint with that address is defined)
- The individual address of the device which generated the frame (souce)
- Hexadecimal representation of the user data contained in the frame (with the value formatted according to the DPT of the datapoint, if defined)
Using the read and write functions you can respectively recall the value currently assigned to a specific group address or write a value to it (if allowed by the KNX framework settings). When reading or writing, the DPT field must be specified so that the value can be interpreted accordingly. The value to be written or shown after a reading, is expressed as a value formatted for the specified DPT.
For details on how a value is formatted for a specific DPT see the datapoint types and values section of the KNX I/O Server page.
The “Scan” button on the top right corner lets you send consecutive read requests to a set of group addresses. Specify the address range using the fields “From” and “To”, press “Scan” and wait until the scanning procedure is complete to analyze the received responses. To interrupt the scanning press the "Stop" button.
