LoRaWAN Utility
![]() The LoRaWAN Utility application provides a graphical interface to configure a LoRaWAN I/O Server. When a LoRaWAN I/O Server is defined in HSYCO, the LoRaWAN Utility will appear among the applications of the manager.
The LoRaWAN Utility application provides a graphical interface to configure a LoRaWAN I/O Server. When a LoRaWAN I/O Server is defined in HSYCO, the LoRaWAN Utility will appear among the applications of the manager.
Contents
Gateways
The LoRaWAN gateway(s) that will be used need to be configured to forward the received device data frames to HSYCO.
To this end, configure the gateway(s) as standard Semtech packet forwarder(s). Make sure the network configuration allows for the communication with HSYCO and use HSYCO's IP address and the port number specified in the "localport" option for the network server's configuration.
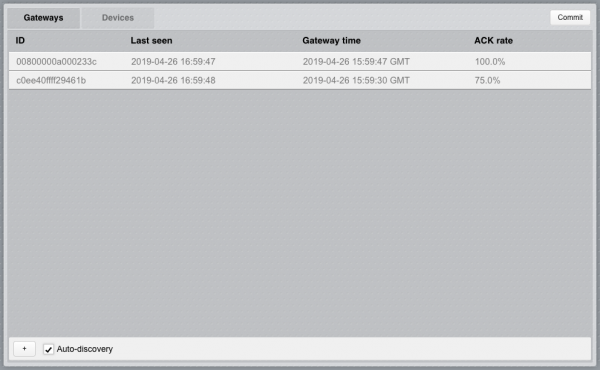
When the gateways are correctly configured, make sure the "Auto-discovery" checkbox is selected under the "Gateways" tab and you will see them appearing in the list:
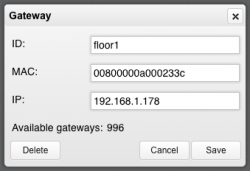
From the list, click on each gateway to add, edit and save its configuration.
Parameters:
- ID: the ID to assign to the related datapoints of the LoRaWAN I/O Server (i.e. "gw.<id>.*"). The default value corresponds to the MAC address.
- MAC: MAC address of the gateway
- IP: IP address of the gateway
If both MAC and IP are specified, packets received by HSYCO will be considered from this gateway only if both parameters are matching. It is possible to omit (leave blank) MAC or IP, in which case the packets will be filtered only by the specified parameter. E.g. if only MAC is specified, received packets containing the same MAC address will be assigned to this gateway regardless of the IP address they were sent from. This configuration can be useful when, for instance, the gateway is configured with DHCP and the IP address is dynamic.
The Available gateways counter shows the remaining number of gateways available, based on the HSYCO I/O Servers license total. If more than the available number of gateways are discovered a "I/O license limit exceeded" warning will show under the gateways list and only the available ones will be listed.
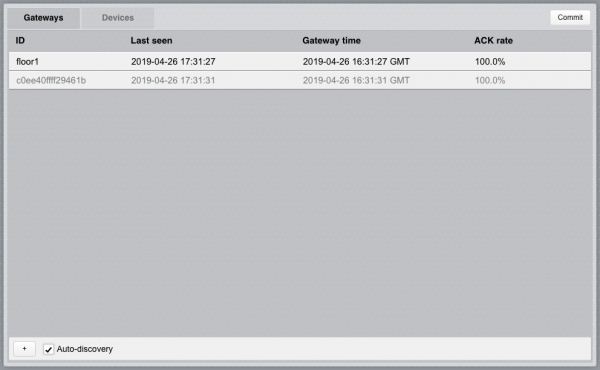
After saving the configuration the gateway will no longer be greyed-out in the list:
To manually add a gateway click on the "+" button at the bottom-left corner of the page.
To remove a gateway, click on it from the list, click on "Delete" and confirm. If the auto-discovery is enabled, the gateway will reappear upon the next received packet from it.
Disable the auto-discovery when all the required gateways have been configured.
The gateways list shows the following fields:
- ID: ID of the gateway
- Last seen: date and time of the last received packet
- Gateway time: internal system time sent by the gateway in the latest status message
- ACK rate: percentage of upstream packets that were acknowledged by HSYCO, as reported in the latest status message from the gateway. If, after initial setup, the value often diverges from 100% there might be networking issues
Devices
To configure the LoRaWAN end devices to be used with HSYCO, select the "Devices" tab and enable auto-discovery ("Auto-discovery" checkbox).
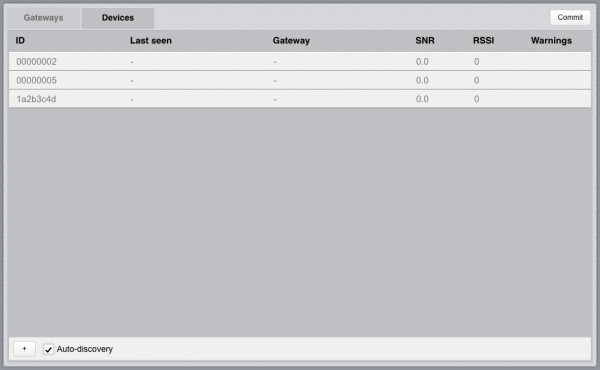
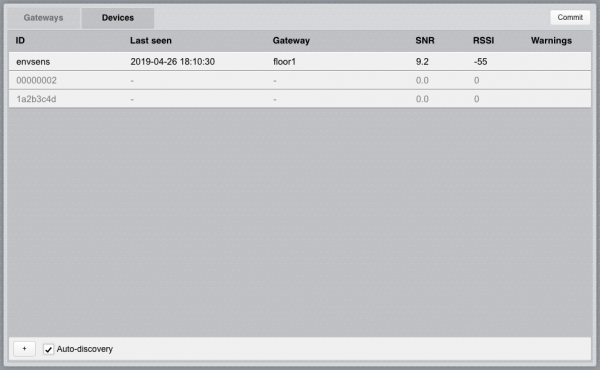
LoRaWAN devices transmitting data within the range of the listed gateways (configured and discovered) will appear in the list:
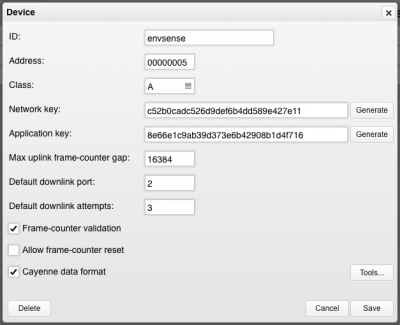
From the list, click on each device to add, edit and save its configuration.
Parameters:
- ID: the ID to assign to the related datapoints of the LoRaWAN I/O Server (i.e. "dev.<id>.*"). The default value corresponds to the device address.
- Address: Device address, 4 bytes, hexadecimal format (e.g. 01aac0)
- Class: Device class: A and C are supported
- Network key: Network key (NwkSKey) set on the device, 16 bytes, hexadecimal format. Click on the "Generate" button to set a random key to be copied on the device
- Application key: Application key (AppSKey) set on the device, 16 bytes, hexadecimal format. Click on the "Generate" button to set a random key to be copied on the device
- Max uplink frame-counter gap: Maximum difference between the value of the frame-counter of subsequent uplink frames received from the device. When a frame is received, its counter is compared to the value of the counter of the latest valid frame received; if the difference is greater than the value of this parameter the frame is discarded. This parameter is taken into account only if Frame-counter validation is enabled
- Default downlink port: Port used by default, if not otherwise specified, for downlink packets for this device
- Default downlink attempts: Number of attempts made by default, if not otherwise specified, to deliver frames for this device to the gateway before discarding it
- Frame-counter validation: When this option is enabled, frames received from this device will be checked to have a counter always increasing, with a maximum difference equal to the value specified in Max uplink frame-counter gap. They will be otherwise discarded, i.e. no data events will be generated. If this option is disabled, frame-counters validation will be ignored. Disable this option only during setup and testing to prevent security vulnerabilities
- Allow frame-counter reset: Enable this option if this device should be allowed to reset its frame counter. This option might be used for devices that do not persist their counters and thus reset on a power-cycle or for devices that use 16 bits counters. When this option is enabled HSYCO will check the progression of the counter and, if consistent with a reset, will allow it. Enable this option only if required. This parameter is taken into account only if Frame-counter validation is enabled
- Cayenne data format: Select this option if this device uses the Cayenne LLP format to encode sent data and have HSYCO automatically decode them and create the corresponding channels datapoints (i.e. "dev.<id>.data.ch<n>" and "dev.<id>.data.ch<n>.type")
After saving the configuration the device will no longer be greyed-out in the list:
To manually add a device click on the "+" button at the bottom-left corner of the page.
To remove a device, click on it from the list, click on "Delete" and confirm. If the auto-discovery is enabled, the device will reappear upon the next received frame from it.
Disable the auto-discovery when all the required devices have been configured.
The devices list shows the following fields:
- ID: ID of the device
- Last seen: date and time of the last received valid frame
- Gateway: ID of the gateway from which the latest frame from this device was received
- SNR: LoRa signal-to-noise ratio in dB of the last valid packet received from this device
- RSSI: Received Signal Strength Indication in dBm of the last valid packet received from this device
- Warnings: Warning on the last frame received. If a warning is shown, it is not necessarily an indication of an issue with the device; for instance, there might be another device with the same address transmitting within range. Possible values are:
- fcnt: frame with not valid frame-counter
- mic: frame with not valid message integrity code (MIC)
- data: error decoding frame data
Tools
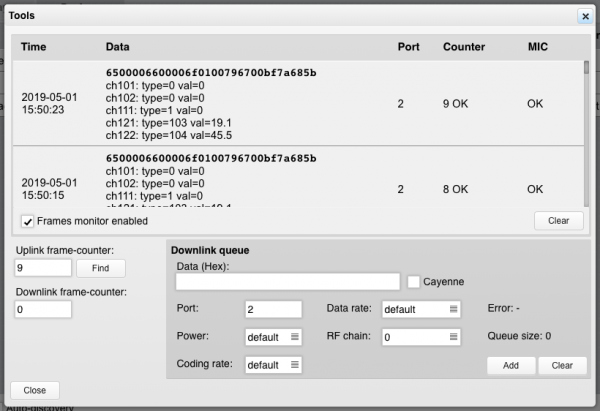
The tools panel offers a set of functionalities to help setting up a device and testing data transmission. To access the panel, click on the "Tools..." button from the configuration panel of a device.
Uplink frames monitor
Select the Frames monitor enabled checkbox to see the received uplink frames from the device in the top list.
Frames list fields:
- Time: date and time of reception
- Data: hexadecimal representation of the decrypted data received in the frame. If "Cayenne data format" is enabled for this device, the decoded channels and values will be shown
- Port: the LoRaWAN port number
- Counter: frame counter validation:
- OK: valid counter
- REP: repetition (same value of previous frame)
- ERR: not valid counter - lower or too far from the previous one (see "Max uplink frame-counter gap" device parameter above)
- MIC: MIC validation:
- OK: valid MIC
- ERR: not valid MIC - might indicate wrong network key or frame-counter not aligned (see #Uplink frame-counter below) or might be a frame received from a different device in range with the same address
Uplink frame-counter
This field shows the saved server-side uplink frame-counter for this device. Manually enter a value to edit it. If never set and no frame has ever been received it is set to -1.
Devices use an internal 32 bit counter for sequence validation, frame encryption and MIC computation, but only the least significant 16 bits are sent in frames. This means that the server needs to "guess" the value of the high bits to be able to decrypt the data and it does so by assuming an always increasing counter between subsequent frames.
If the received frames show a MIC error, it might be necessary to align the server counter with the device counter. To this end, click on the "Find" button: HSYCO will try all possible high bits for the counter of the last frame until a valid MIC computation is found and the new counter is shown and set. If no valid match is found an error message is shown, in this case check the network key.
Downlink frame-counter
This field shows the saved server-side downlink frame-counter used for sending frames to this device. Manually enter a value to edit it. If never set and no frame has ever been sent it is set to -1.
Downlink queue
Use this panel to test downlink communication to the device.
Enter the data in hexadecimal format or select the "Cayenne" checkbox to create a Cayenne-encoded frame with the specified channel number, type and value. See LoRaWAN#Cayenne_LLP_format for values formats.
Specify the transmission parameters or use the default values to have them dynamically selected based on the received frames.
Click on "Add" to enqueue the packet, you'll see the queue size increase and then decrease again when the packed is delivered to the gateway. If errors occur they will be shown.
Click on "Clear" to remove unsent packets from the queue.
Committing the configuration
When all gateways and devices are configured (not greyed-out in the lists), click on the "Commit" button on the top-right corner of the main page. The configuration will be persisted and the LoRaWAN I/O Server will restart with the new configuration.
