Difference between revisions of "Introduction to I/O Servers"
| Line 205: | Line 205: | ||
[[File:IO Server Intro Uiset Action Visibility 1.png|border]] [[File:IO Server Intro Uiset Action Visibility 2.png|border]] | [[File:IO Server Intro Uiset Action Visibility 1.png|border]] [[File:IO Server Intro Uiset Action Visibility 2.png|border]] | ||
| − | The Image object will be visible when datapoint bar has value "a" and invisible otherwise, while the Panel object will be visible when datapoint bar has value "b" and invisible otherwise. | + | The [[Image]] object will be visible when datapoint bar has value "a" and invisible otherwise, while the [[Panel]] object will be visible when datapoint bar has value "b" and invisible otherwise. |
Latest revision as of 16:41, 4 March 2014
An I/O Server is the logical representation of a field system integrated in HSYCO. A field system can be, for instance, a security system, a BUS network or even something more abstract as weather information gathered from the Internet.
All I/O Servers provides for datapoints through which they receive commands and/or trigger events. That is, you can use these datapoints in your programming logic or user interface to send commands to the field system or to act upon its changes.
The first step when integrating a new system is to configure the corresponding I/O Server. This is accomplished using the I/O Servers section of the Settings application accessible through the Manager.
From here you can define a new I/O Server, set its ID and specify the communication parameters and its options. Details of this settings are provided in the I/O Servers application notes for each integrated system.
The ID of the I/O Server is used to reference it in the HSYCO environment.
Contents
Using Datapoints
A datapoint is univocally identified by the combination of the I/O Server ID and the ID of the datapoint, using the format <io_server_id>.<datapoint_id>.
All the available datapoints for an I/O Server are detailed in its application note. A datapoint can be readable (R) and/or writable (W).
Let's introduce these concepts with an example. Assume an I/O Server has the following datapoints table:
| ID | Value | R/W | Description |
|---|---|---|---|
| foo | 1 | R | ... |
| 2 | R | ... | |
| reset | W | ... | |
| bar | a | R | ... |
| W | ... | ||
| b | R | ... | |
| W | ... | ||
| unknown | R | ... |
This table specifies that this I/O Server has 2 datapoints: "foo" and "bar". If we read the "foo" datapoint, we can see 2 possible values: "1" or "2", further we can write only the value "reset" to it. On the other hand, the "bar" datapoint can be read in three different states ("a", "b" or "unknown") and we can set it to the values "a" and "b".
Assuming we assigned the ID "ios" to this I/O Server, we will reference these datapoints as ios.foo and ios.bar.
Readable Datapoints
The main use for readable datapoints is to execute actions when they trigger an event. This can be done in Events Programming using the "IO" event keyword or in JavaScript or Java Programming using the callback method IOEvent.
Events example:
IO ios.foo = 1 : ...
JavaScript example:
function IOEvent(name, value) : {
	if (name == 'ios.foo' && value == '1') {
		...
	}
}
Java example:
static void IOEvent(String name, String value) {
	if (name.equals("ios.foo") && value.equals("1")) {
		...
	}
}
Events are generally triggered whenever the readable datapoint's value changes, but some datapoints may trigger events even if the value is unchanged. This is done to better fit the behavior of some field systems and is specified in the I/O Server application note.
The value of a readable datapoint can also be read at any time.
In Events, you can assign the value to variables in an action:
... : $var = IO ios.bar, $var * 10, LOG = $var
or directly pass it as value to other actions:
... : UISET object.value = IO ios.bar
... : DATALOGGER mydat = IO ios.foo
In JavaScript and Java you can recall the value of a readable datapoint using the utility method ioGet:
...
x = ioGet("ios.foo");
myFunction(x);
...
Writable Datapoints
Writable datapoint are used to send commands to the field system.
Using Events Programming you can write a datapoint using the "IO" action keyword, e.g.:
... : IO ios.bar = a
Using JavaScript or Java Programming, you can call the method ioSet, e.g.:
...
ioSet("ios.bar", "a");
...
The commands are queued and executed as soon as the I/O Server is ready to process them.
User Interface
Some I/O Servers provide for the possibility to send commands directly from the user interface and to have UI Objects showing the field system status without writing any programming logic. In an I/O Server application note the section "USER Commands" lists all the possible commands it is able to process from the user interface, while the section "UISET Actions" shows the actions it performs on UI Objects to show the status of the field system.
USER Commands
To send a command to an I/O Server from the interface use any object able to send USER commands (e.g. User buttons, UserImages, ...) and set its parameters according to the table in the I/O Server application note.
Consider this example table:
| Name | Param | Action |
|---|---|---|
| foo | reset | ... |
| bar | a | ... |
| b | ... |
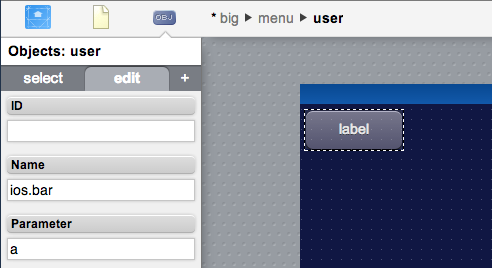
We can, for instance, send the command "bar = a" with a User button:
All we have to do is set the "Name" field of the User button to the name specified in the table (as usual, prefixed by the I/O Server ID, i.e. "ios.bar") and the "Parameter" field to the value we want to send. No further programming is needed.
UISET Actions
To show the status of the field system, many I/O Servers perform UISET actions to change attributes of specific UI objects.
Consider this example table:
| ID | Attribute | Set to | |
|---|---|---|---|
| foo.label | value | the value of the datapoint foo | |
| bar.label.a | visible | true | when bar's value is "a" |
| false | when bar's value is not "a" | ||
| bar.label.b | visible | true | when bar's value is "b" |
| false | when bar's value is not "b" | ||
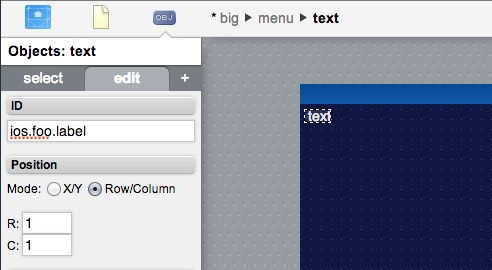
According to this table, we can use any object that has the attribute "value" to see the value of the datapoint foo, for instance we can use a Text object:
All we have to do is setting the ID of the object as specified in the table (prefixed with the I/O Server ID), e.g. "ios.foo.label". Without any other programming we have a label in our interface that show "1" or "2" according to the value of the "foo" datapoint.
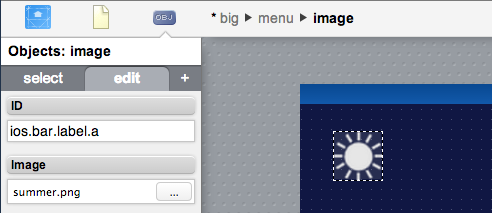
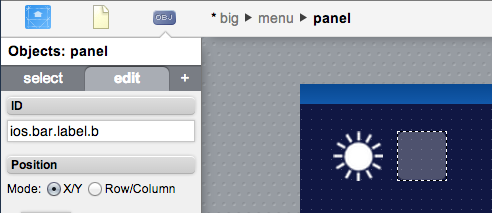
Further, always according to the above table, we can have objects appear and disappear (i.e. attribute "visible" set to true or false) from our interface depending on the state of datapoint "bar":
The Image object will be visible when datapoint bar has value "a" and invisible otherwise, while the Panel object will be visible when datapoint bar has value "b" and invisible otherwise.


